Create login in the Terra Config Portal:
If there is no login yet, the first step is to request one from ABB Switzerland.
Select "Terra Config Portal" in the form, this is mandatory to create OCPP server.
https://forms.abb.com/form-44052/antrag-account-ac-terra-deutschland
Create OCPP Server:
Log in to the TerraConfig Portal: https://abb.installer.chargedot.com/#/login
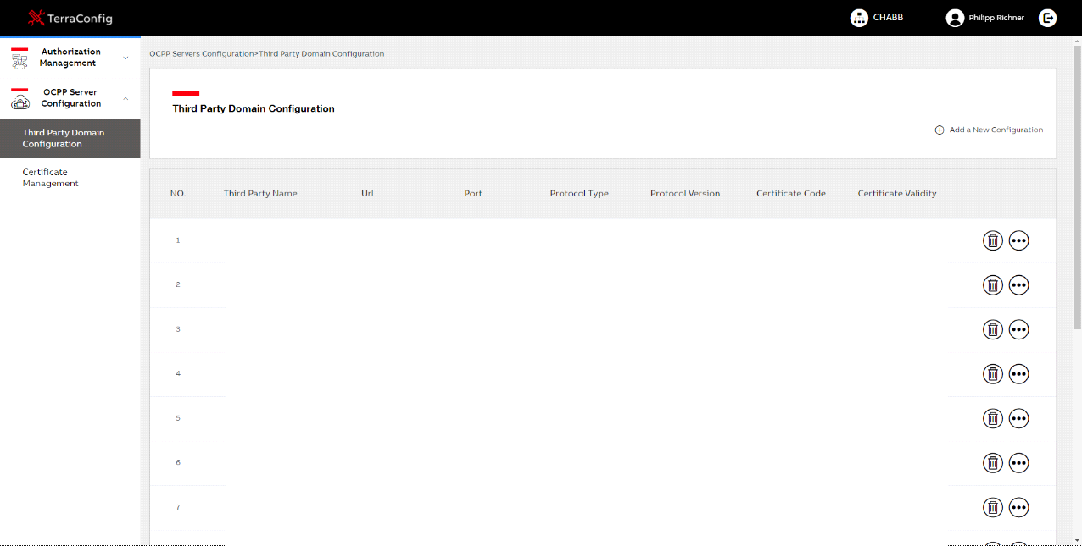
Go to "OCPP Server Configuration" -> " Third Party Domain Configuration " There top right a new configurationcanbecreated .
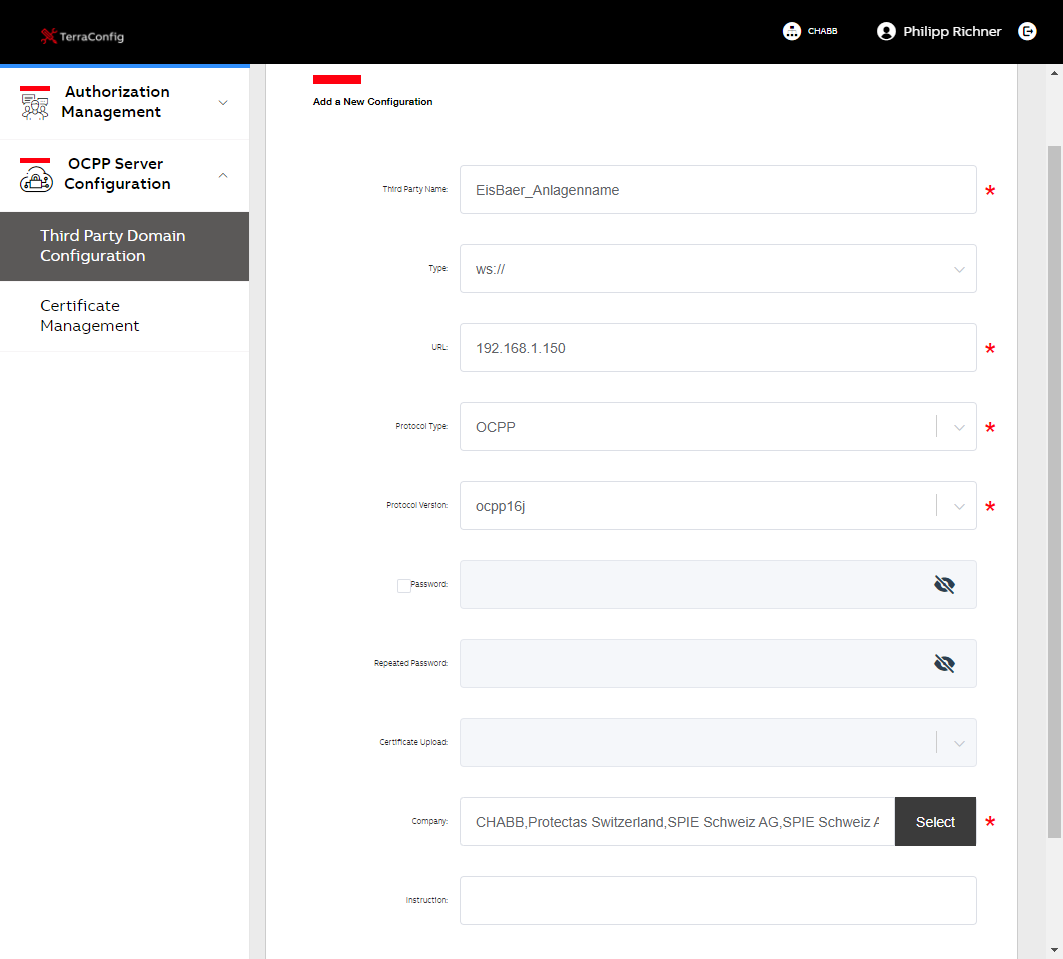
Third Party Name |
Unique name for this plant (serves for later identification in the app) |
Type |
select "WS:// |
URL |
Enter here the complete URL which was/will be configured in EisBaer. |
Protocol Type |
OCPP |
Protocol Version |
ocpp16j |
Password |
Disable password |
Afterwards the configuration can be saved, the configuration in the TerraConfig portal is finished.
OCPP configuration in EisBaer
The first step is to define the connection settings:
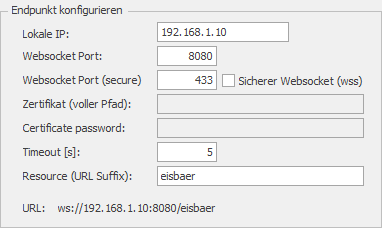
Local IP |
IP address of the EisBaer server. This should be fixed. |
Websocket Port |
Port to be used. ATTENTION: Port must be added to the firewall! |
Websocket Port (secure) |
will be used only if enabled |
Resource (URL suffix) |
individual name for the system |
URL |
Here you can see the complete URL for the OCPP server in the Eis- Bär. ATTENTION: This must match the URL defined in the TerraConfig portal! |
Now the OCPP Backend's are defined, if this is needed. If the system is only used in local operation without billing via a backend, this step can be omitted. This can also be used to continue using the Charger with the "ChargerSync" portal (excl. charge management).

Name |
Unique name which can be seen in the channel configuration afterwards. |
URL |
The URL of the backend (e.g.: ABB ChargerSync: wss://abb.cdlink.chargedot.com:9043/ocpp ) |
User |
User defined by the backend |
Password |
password defined by the backend |
Transparent proxy |
All data is forwarded directly to the higher-level backend (EisBaer then does not perform any charge management functions!) |
Local Authorization |
If this parameter is active, the authorization of the charging processes is only done locally in EisBaer and not via the portal. |
ID as username |
This parameter has to be activated if the backend needs a username for each charging station which corresponds to the identifier of the station. (e.g. backend "Move") |
Now the individual channels (charging stations) are created.

Name |
The name of the charging station (e.g. parking lot number) |
Station Active |
Activate / deactivate the station |
Version |
Here you can choose between OCPP protocol version 1.6 or 2.0. For the ABB AC Terra and ABB DC Charger version 1.6 must be selected. |
Charging station ID |
Serial number of the charging station. For the ABB DC Charger the serial number must be added as "Name" in the charger configuration. |
Ports |
Number of connections that the charger has |
Minimum current |
Minimum current that the charger is allowed to use for charging. |
Authorization |
Active - RFID authorization is required, which is checked locally / backend Inactive - Each charging process is automatically started/enabled |
Configure on connection |
Send the configuration from the "configuration file" to the charging station (should be activated) |
Configuration file |
Enter the configuration file depending on the charger used ABB AC Terra : ABB_Terra_AC.cfg ABB DC Charger : ABB_Terra_DC.cfg for 3rd party charging stations or user specific customization the files in the folder can be adjusted manually ( C:\ProgramData\Alexander Maier GmbH\EisBaer 3.0\OCPP\ConfigFiles) |
Shutdown configuration |
Here the appropriate configuration to be used can be selected. Parameters which should be transmitted to the charging station when it is deactivated |
Proxy Backend |
Select backend (if needed) |
Link OCPP & DLM
Only one link is required for the connection between the individual stations (OCPP) and the management (DLM):
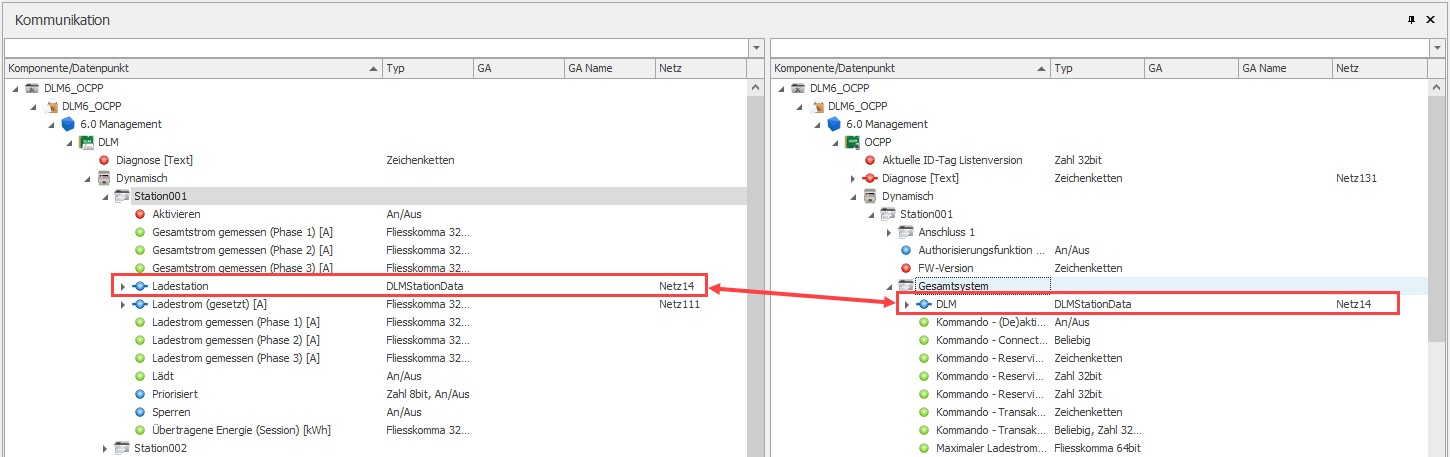
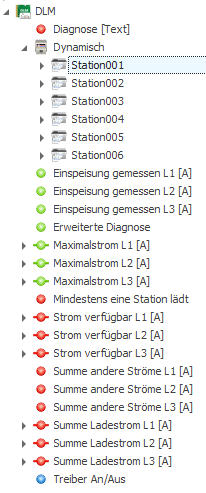
Further linkages are optional in each case and to be used depending on the application / requirement:
Feed measured Lx [A] |
Here the measurement of the main meter/house connection is connected |
Maximum current Lx [A] |
Current desired maximum current for charging management |
At least one station is charging |
As soon as a station is charging, this is output here (e.g. necessary for DLM Master-Slave) |
Current available Lx [A] |
Current available (difference between current and maximum current) |
Sum of other currents Lx[A] |
Sum of currents not consumed by the charging stations. |
Sum of charging currents Lx[A] |
Sum of the currents of all charging stations. |
Terra DC connection
In the case of Terra DC, a separate meter should ideally be connected upstream in order to obtain the effective measured values of the individual phases, since only the DC measured values come back from the station via the OCPP communication.
In this case, the links must be made as follows:
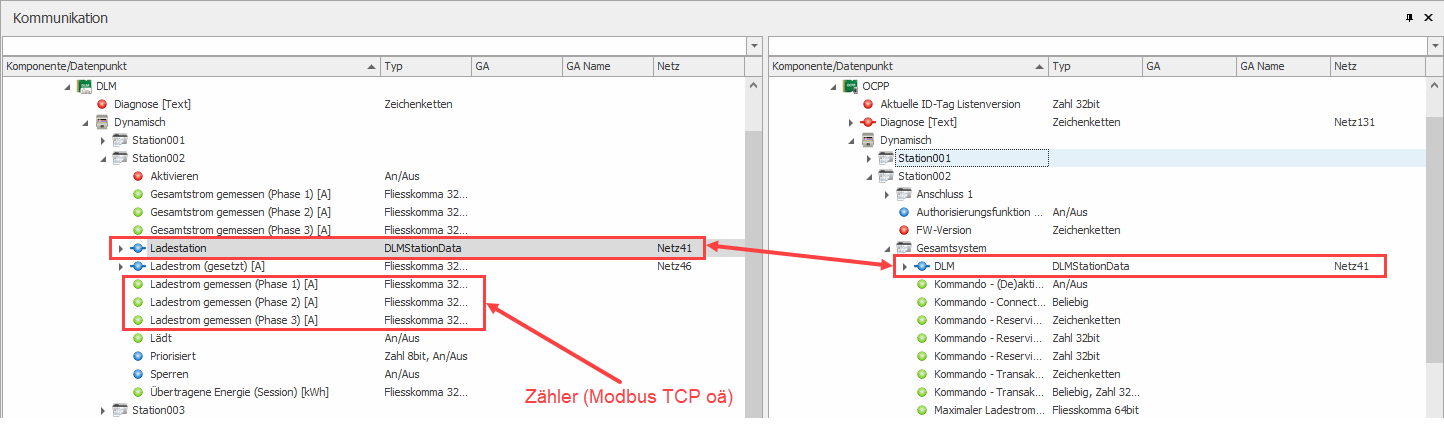
If no meter is available or can be installed, the way via calculation can also be realized in a logic, which converts the DC current & voltage values to AC. This is not as accurate as metering, but is sufficient for many applications.
Configuration Terra DC
The Terra DC are all commissioned either by ABB itself or by a certified partner. Accordingly, the configuration will not be discussed in detail here. Basically there are 2 important settings to be made here:
User name: Serial number of the charger
OCPP server: Specification according to configuration EisBaer
Configuration AC-Terra
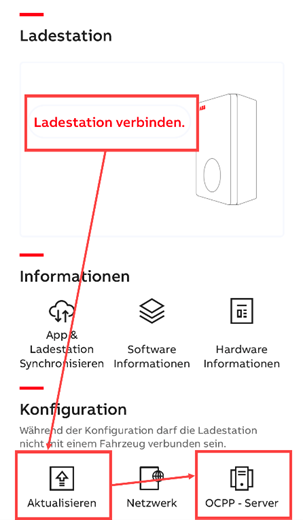
Settings using the "TerraConfig App" directly on the charging station. In the first step, it is recommended to check the firmware version and possibly perform a firmware upgrade during initial commissioning. The OCPP configuration of the station can then be carried out. To do this, go to the "OCPP Server" setting of the station. Add there your OCPP server via the "+".
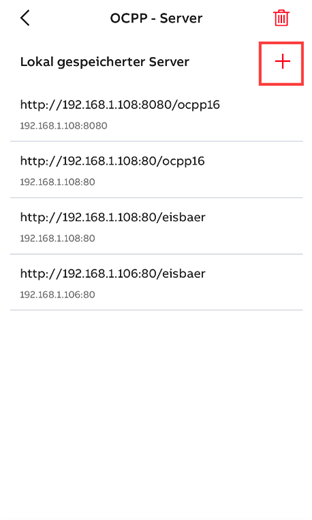
Select your OCPP server and download the configuration. Now you have this as a selection and can load it onto the station.
RFID authentication
If the authentication is realized locally in EisBaer and not via a backend, this is realized by means of a csv list which can be downloaded or uploaded from the running server.
ATTENTION: Do not store duplicate RFID tags!

idTag |
RFID tag (default for ABB tags e.g. No.00000001234). If external card provider is activated, the effective serial number of the RFID tag must be entered in the charging station. |
Name |
Name of the card user |
RestrictCPs |
FALSE: it can be charged at all charging stations TRUE: it can only be charged at specific charging stations (see below) |
CP1,...CPN |
Specific charging stations where the RFID tag is allowed to charge (serial number) |
restrictCalender |
ID tag visible in the calendar function |
Mail address |
Mail address of the user |
SendMailAfterTransaction |
Shall be sent an email with the loading transaction info to the user at the end of each loading transaction. |