The IRTrans driver is an unVisiblee server component with the ability to control any device that can be operated via IR remote control. The driver connects to the IRTrans server. This serves as an interface to the IRTrans modules. The connection is bidirectional. This allows you to send commands to the interface via the existing remote controls.
Using this component requires the installation of the IR Trans server on the server PC.
The data point / commands can be created or read manually.
Data points of the component
Name |
Type |
function |
|---|---|---|
Driver On/Off |
Bidirectional |
Driver on or off. |
Connection State |
Output |
If the connection to the server is successful, an on signal is output. |
Dynamic |
Folder |
Folder Dynamic displays the data points for the commands. Depending on the type, outputs or inputs are provided. |
Last received |
Output |
Here, the received commands are output formatted. The output is used to diagnose circuits. |
Properties
Name |
|
function |
|---|---|---|
Channels |
|
Here the imported or manually created channels are listed. These then appear as sub-folders in the data point Folder Dynamic. |
Server |
localhost |
Set the IP address of the server here. When using the device name, please note that it must not contain any spaces. |
Driver On/Off |
|
This can be used to set whether the component should be active when the system is started. |
Channels
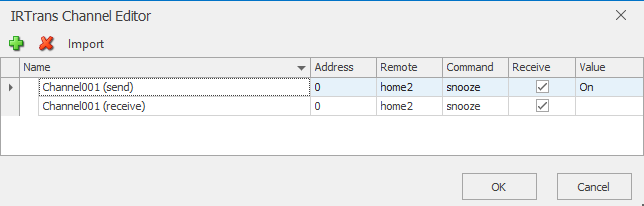
Import the configured data from the remote file from IRTrans into the channel list. When you finally exit the editor with OK, the existing data points in Folder Dynamic are displayed in the data point window.
-------------------- OLD_TEXT ??? ---------------------
Purpose
Using "IR Trans" gives you the ability to control every usual infrared device from the EisBaer. IR Trans can send and receive IR signals. The component is invisible, ie, the operator cannot see it in Runtime.
Properties
Name |
Editor |
Function |
Channel |
Create the individual data points by importing the IRTRans code file. (rem) Dynamically created IR-Outputs |
|
Server |
IP address or host name of then IRTrans server on which the IRTrans Tray is running. For details refer to the IRTrans software documentation. |
|
Driver On/Off |
The driver default status at system start up. |
Introduction
Before you make a first test, you should first install the latest drivers and the software for your IRTrans device installed on the PC. Then you learn a few IR codes your remote control and check the
device and the code to function (send / receive). The short course is described below in detail. Use for the installation the current software version from IRTrans home page or the included
CD-ROM. The software is available free for download www.irtrans.de to the download area - it is there constantly updated. It is worthwhile now and again to surf there.
IRTrans Windows Software Complete installer with USB drivers
The appropriate driver will be installed automatically. With the installation is a dynamic setup that during the installation of any other install files Website / CD are loaded. An Internet connection
should be given. Take care when installing the USB driver please note the following sequence: before connecting the IRTrans device first install the software (Setup.exe).
Here, the correct USB driver is installed automatically. If you after installation are asked to reboot the computer, you should necessarily follow. After restarting, connect the USB device IRTrans. The driver
is automatically installed during the device detection. If the device IRTrans already is connected or installed, the driver via the device manager is updated. Now start on START - PROGRAMS - IRTrans - IR TRANSTRAY USB. In the Systray (in the taskbar to the left of the clock) you will see the red IRTrans icon. Using the right mouse button to access the functions of the device, such as send codes, diagnosis, etc.
IR-Trans server configuration
The following sub section describes the configuration of the IR-Trans server which is important for a subsequent EisBaer connection. The self learning of the remote command as well the database
flashing in case of a IR-Trans DB is used, will be explained.
IR-Trans self learning of IR codes
Start from Start - programs - IRTrans the IRTrans GUI client. Go over the menu item Mode and select commands to learn. Use only the GUI client IRTrans to teach the IR commands.
Tip: If you are running the GUI client will receive an error message, it is possible that the IRTrans tray (USB / LAN) or IRTrans server is not running. Through programs - IRTrans Tray, you can always start
them manually.
This opens a dialog box with which you can program the IR codes for your remote control.
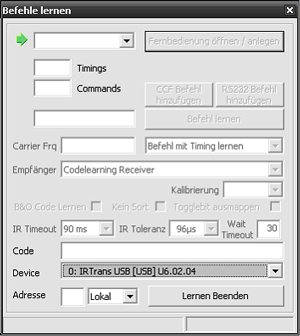
Assign a name, open the first remote control / create, for example, the remote, or the device to be controlled because it is possible to teach, multiple remotes and IRTrans to operate simultaneously.
There are several codes in the IRTrans server load - and this is already brilliant - only one transmitter / receiver for many different IR codes of manufacturers for this to send or receive information via, for
example, Eisbaer KNX Note: Make sure that the spelling of the name and the remote commands, as these later in the EisBaer have to be absolutely identical. Click once on the command get to learn timing. Then you begin to learn the necessary Keys in succession.
In the following example, we learn the remote control of the iP27 (Portable Travel Alarm Clock for iPhone and an iPod from iHome) to later remotely control a travel alarm clock by Eisbaer KNX. The
second remote control we get a standard remote control to switch via infrared to EIB / KNX functions and Elements of the visualization, and a stereo system. Decide teach at making you aware of what kind of IR-Code/remote control you want. In the example we used the setting command to learn timing. Enter now in the shared field the name of the command or the button on the Remote control and click on learn command. Press the button on the remote control - in this example, this is the PLAY / PAUSE.
Note: Avoid during the naming of commands, special characters.
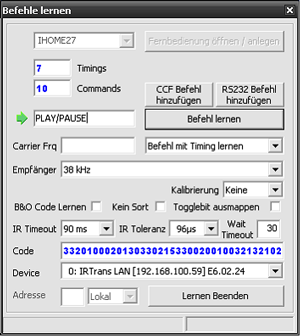
Once the command is programmed, you can proceed directly to the next, until all required codes, are stored in remotefile. To finish, click on Learn Exit the Teach stop. It has now created a new remotefile, including the IR codes and command names. When the IRTrans server is started these remote files are loaded later automatically.
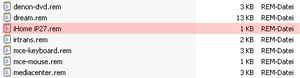
Note: Each learned remote control is found as a file in the folder C: \ Program Files \ IRTrans \ remotes to see name.rem. Also, there are already some pre-defined remote files for common devices to be
found. For the subsequent creation of the commands in the EisBaer is the exact file name and the names of individual commands necessary.
Flashing IRTrans LAN DB
The IRTrans LAN modules with DB have another advantage - the programmed codes may be stored directly in the device. For this purpose, the corresponding remote file, which you see described above, is stored in internal memory of the device by flash function. Note: The flash process you only need when you are later on the touch panel, or the visualisation computer where IRTrans software can not be installed, or working with several LAN modules and
various remote files via LAN. In Eisbaers, you need then later the component "MULTI-IO-IP" to send and receive the codes (see chapter IR commands using Multi-IO-IP via LAN / WLAN )
First, create, as described above, the required remote file for your remote control / device on the IRTrans tray and then start on START-PROGRAMS-IRTrans IRTrans the GUI Client. You can also use theGUI client for learning.
Now the following program window appears:
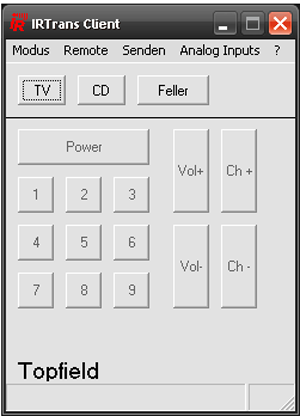
Select from the menu bar under Mode the menu item Device database. Shortly thereafter, opens a new window with a list of available remote control codes. With this window, you can now flash in the corresponding remote control or the created remote file of the IRTrans device.
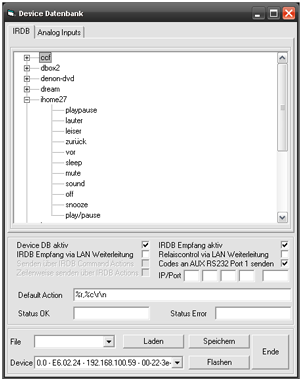
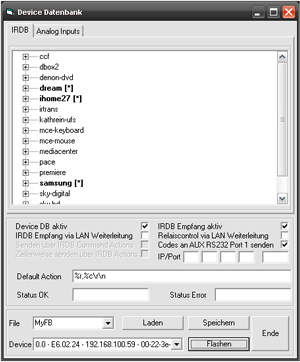
Select from the list above to get your remote control. Now click with the right mouse button on the selection and then in the context menu, select. In our case This is ihome27. The corresponding remote control will now be bold and with an asterisk shown in square brackets. You can also choose to repeat multiple remote controls (see figure ). Now type in the lowest field first a name for the flash file if, for example, MyFB and click the Save
button. To now transfer the codes of the selected remote controls in the unit, please click on the button flashing.
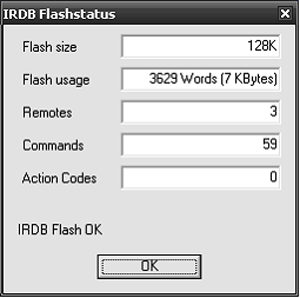
Wait a moment, until the message window after the flash process appears. This can take several seconds to complete. The window (see figure) can now, if the line Remotes and Commands corresponding Values are, be
closed with the OK button. If the values do not agree, simply repeat the process again.
IR-Trans client configuration
As client we use the IR-Trans component of the EisBaer. Therefore you have to drag it on the EisBaer designer, first. For the configuration please open the configuration dialog by clicking on at the
command list property at the property window. Within this dialog you can add and remove IR commands.
Add new infrared commands
To create a new infrared command, click in the toolbar . Now in the dialog appears a new line where you can configure the infrared command.
Name
Define a name for the command.
Address
Device address of the IR-Trans. This is only needed in case of serial connection of more than one IR-Trans. Default value is "0".
Remote
Name of the remote control eg Loewe, Samsung, LG,...
Command
Please enter here the desired IR-Trans command.
Received
If you like to receive commands you must activate this checkbox.
Value
Here you define the value which is sent on a EisBaer net in case a value is received from the IR-Transceiver.
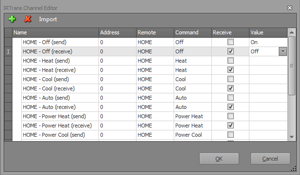
Define IR-Codes in EisBaer Editor
There are several ways to send and receive the IR codes via KNX EisBaer depending on which IR-Trans device is used and the conditions are met. The next section explains how to do this with the previous
devices in various ways. The fastest and easiest solution is the use of IR-Trans USB/LAN - products, a locally IR-Trans server installed and finished EisBaers-IR-Trans component. The IR-Trans LAN devices without the IR-Trans server codes are purely sent and received on telegrams in the network - you can not, however, use the IRTrans component in Eisbaers That are available in the Eisbaers, but must, for example, use for the input the multi-IO-IP component. The transmission
itself is implemented relatively fast with simple HTTP commands, for which also the multi-IO-IP component can be used.
Define IR-Codes
Start Editor and open a blank page for the first test of a project. Place the IRTrans component found in the component list in connections to this page. Add a few more button switches as active components. You can immediately correctly name them, for example, with the appropriate commands, which should be sent, as in the example below. We recommend that if you teach the IRTrans component the IR codes, with a normal Text editor such
as Notepad to keep open the remote file created for you to incorporate codes easier. Open directory in c: \ Program Files \ IRTrans \ remote your created Remotefile with a Text editor,
before continuing in the Eisbaer. In our example, we open the file iHome iP27.rem, the content looks like.
Important now are the messages that are listed red. You need one time the exact name of the remote name and the individual commands (commands) in the brackets. This you must now enter into the
component as follows: mark the IRTrans component and open the Command List window with dialogue button fromthe Properties window in the Eisbaer. Click once on the top left of the + symbol to create a new command. Give this command a unique name such as Play / Pause - depending on what make the command does later. Set address at 0 and then enter the remote name, as indicated in the rem-file. Under command you type the appropriate
command as specified in the rem-file, but without brackets. If a command is to be sent, simply remove the checkmark in the column Receive. If the command is received, however, you can set the check mark and arrange the incoming command to a value. This can be a KNX-value (EIS type), but also a string, or a hex value. You can use any existing KNX-like Eisbaer types. Following the transfer of commands, the contents should look like this in the configurator:
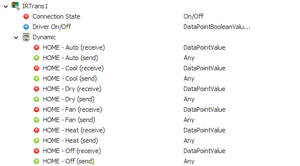
You do not need to take more care about the code in the Eisbaer. In the communications window at the activated IRTrans component, you can now see the relevant data points, as these have been named.
You have now to link the data points of IRTrans component with the appropriate button switches to Image switches and can then immediately control live from the editor via infrared. So, for example, drag the data point OFF and drop to the respective switching element and release. In the context menu pop up, then connect for example with the output of a switching button or switching image - finished.
Now press the CTL key and click to select the simulation mode and click on the switching element with the left mouse button to send the command.
Observe the LED on the top of the IRTrans - these must be red flash (send). When you receive this lights green.
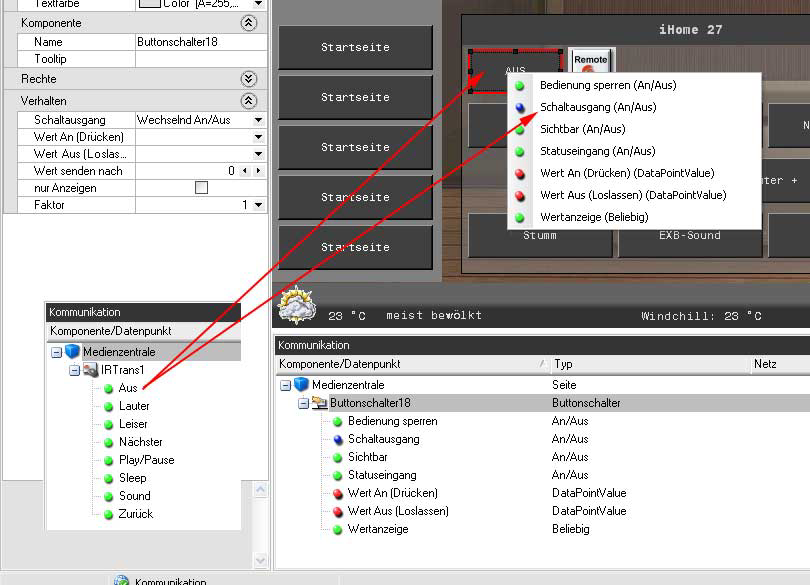
Tip: If it does not work immediately, first check whether the IRServer is running. This must be in operation before the start of Eisbaers, or access is not possible.
Save the project and quit the editor. Start the IRTrans tray manually then open your project with the Eisbaers editor or Runtime. With the IRTrans tray, you can through the function Detected IR Commands monitor and read as
done. You see immediately whether the telegrams are sent and received correctly. You see - this is easy to deploy and very fast and you can control within minutes your complete media
technology via infrared over the visualisation.