The calendar is an invisible server component with the possibility to control the time of created channels. A use as a pure appointment calendar, without switching function, is also possible.
The calendar can control up to 999 channels. For each channel a name, a colour and any start and end value can be defined.
To use the calendar, at least one calendar editor must be connected as a visible client component. The use of several editors on different pages of the project is also possible. This allows several operator stations to access, display and operate the same calendar. The sorting of the channels is alphanumeric.
Data points of the component
Name |
Type |
Function |
|---|---|---|
Deactivate |
Input |
With an on signal, the calendar is disabled and all channels that havestatussend active (and status send on start) send value inactive. With an Off signal on the datapoint, all channels that have Send Status active (and Send Status on Start) send the actual state to the output. |
Deactivate state |
Output |
Outputs the disable status. (On = disabled, Off = active) |
Debug [Text] |
Bidirectional |
Status and error reports are output as text. Attention: Diagnostic or debug outputs are only intended for error cases. Please use only with consultation of the support team! If used, these can significantly affect the performance of the service. |
Dynamic |
Folder |
Data points for the defined channels are displayed in the Dynamic folder. These must be linked here. See below |
Advanced diagnostics |
Input |
To (dis)enable the extended debug output. Attention: Diagnostic or debug outputs are only intended for error cases. Please use only with consultation with the support team! They can significantly affect the performance of the service when used. |
Calendar Editor |
Bidirectional |
Connection between a calendar and one or more calendar editors. |
Lock |
Input |
An on signal at this input disables the output of the switching commands of all channels. An off signal releases the output again. The states of the outputs are not sent. |
Lock state |
Output |
If the calendar is locked, an on signal is output at this data point. |
Call startup routine |
Input |
Trigger input to call the "Send status at start" again. |
Appointment |
Folder |
This folder contains the data points for import and export options. |
Delete appointments |
Input |
An on signal at this input deletesall appointments of the calendar. No further query appears. Please note that the last status of the channel is retained! |
Appointment
Name |
Standard |
Function |
|---|---|---|
Import CSV file |
Input |
Imports the calendar entries from a CSV. Description see below. |
Import CSV text |
Input |
Imports the calendar entries from a CSV. Description see below. |
Exchange Import |
Input |
An on or off signal is used to trigger the calendar import from the Exchange server. The import process may take some time. Setup see below. Appointments that have been created in the EisBaer will be kept. |
Exchange Import Status |
Output |
Display whether the import process is still running (on) or finished (off). |
Export XML file |
Input |
Exports the calendar entries. This is only used for data backup. An 8Bit value is used. Storage path: C:\ProgramData\Alexander Maier GmbH\EisBaer 3.0\Export\calendar |
Import XML file |
Input |
Imports the calendar entries. Serves as data recovery. Here an 8Bit value is used, which corresponds to the exported 8Bit value. |
Output |
Output of the appointment data in xml format. This data can be sent to another calendar (XML text import). |
|
XML text export trigger |
Input |
Trigger input to output the appointments at the output "XML text output" in xml format . |
Input |
Input for the calendar entries as xml text. The data can come from another calendar (XML-Text Output). |
Dynamic Data points per Channel:
Name |
Type |
Function |
|---|---|---|
Output |
Output |
The value set in the channel list is output here |
Subject |
Output |
The subject text of an event is output here at the start time. The text is deleted at the end time. |
Deactivate |
Input |
The channel is deactivated with an on signal. If Send status is active (and Send status at start), the value issent inactive .With an Off signal on the data point, the channel (if SendStatus is active),sends the actual state to the output. |
Disable Status |
Output |
Outputs the disable status. (On = disabled, Off = active) |
End Offset |
Bidirectional |
Set the offset for ending the channel in minutes. |
Name |
Output |
Text output for the appointment name |
Offset output |
Output |
The set signal is output here at the respective offset time. |
Lock |
Input |
An on signal at this input disables the output of the switching commands of this channel. |
Disable status |
Output |
If the channel is disabled, an on signal is output at this data point. |
Start offset |
Bidirectional |
Setting the offset for starting the channel in minutes |
Appointment visible |
Input |
Via an on-signal the appointments of the channel become visible. An off signal makes the appointments invisible. |
Appointment visible Status |
Output |
Status output of the visibility. On = visible, Off = not visible. |
Date info (current/next) |
Folder |
This folder contains information about the appointments of the channel (current and next). |
Description |
Output |
Output of the appointment description in text form. |
Subject |
Output |
Output of the appointment subject in text form. |
End |
Output |
Output of the appointment end in text form (date and time). |
Combined display |
Output |
Output of the appointment information in combined form (time from - to and subject). This can be varied in the properties of the component under "Info Format". |
Start |
Output |
Output of the appointment start in text form (date and time). |
Properties
Name |
Standard |
function |
|---|---|---|
Channels |
0 |
Here the individual channels are defined in a list. These then appear as output in the data point folder Dynamic. Depending on the user set, these channels are available when an appointment is created. Channels can also be read in via a CSV file. One channel and its name is added per line. No further formatting is necessary in the file. |
Send state at startup |
|
If this parameter is set, the current target status of the channels is sent when the solution is started in the server or when the simulation is switched on in the editor, provided that Send status is activated in the channel. The status is not sent when the calendar is reactivated from the deactivated state. |
Delete non-existing appointments |
|
If this parameter is set, any existing appointments will be deleted if they are not (anymore) available in the CSV to be imported. Otherwise, the appointments will only be deleted if the start date is empty. |
CSV Import - Appointment filter |
|
If this option is activated, only those appointments are imported via the CSV import for which an output (channel) is also defined. |
Info format |
|
Here the output of the "Combined display" can be formatted. The 2 display blocks are separated with ;. 1st block = date time according to the formatting, separator = ; 2nd block = free text and/or %s for the display of the subject of the appointment and/or %d for the display of the appointment description. Example: dddd", den" dd.MMMM yyy HH:mm "Uhr"; Free text %s %d Output: Wednesday, 24 February 2021 12:00 - Wednesday, 24 February 2021 13:00 Free text Subject Description Important: If no free text/subject/description is required, a semicolon (;) must still be placed after the formatting! |
Export appointments on change |
|
If this option is set, an export is automatically triggered when appointments change. |
Exchange configuration |
|
Here you can connect to an Exchange. Further information is available below. |
Channel List
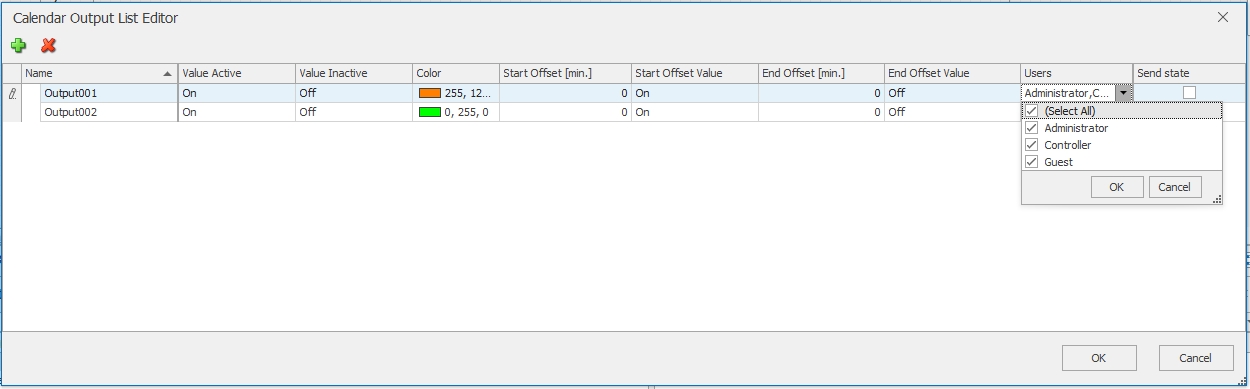
When adding a channel, set the following items:
| - Name: | Name of the channel with up to 255 characters. This is also the name of the data point on the calendar (Folder Dynamic). With this name, the channel is displayed in the calendar editor for selection. |
- Value active: This value is sent at the switch-on time of the time beam. Any data types are possible.
- Value inactive: This value is sent at the switch-off time of the timeline. Any data types are possible.
- Color: Defines the display color for the display in the calendar editor.
- Start Offset [min.]: This time (+ or -) in minutes is added to the switch-on time of the channel and sends the value Offset active.
- Offset value active: This value is sent at the switch-on time +/- of the offset time of the time beam. Any data types are possible.
- End Offset [min.]: This time (+ or -) in minutes is added to the switch-off time of the channel and sends the value Offset inactive.
- Offset value inactive: This value is sent at the switch-off time +/- of the offset time of the time beam. Any data types are possible.
- Users: Selection of users allowed to view this channel. This setting must be checked for users who have been added subsequently.
- Visible: Option whether the created appointments of the channel are displayed or not.
| - Send status: | If this parameter is set, the status of the channel is sent when programming the switching time in the calendar editor if it leads to a change of the current status due to the newly programmed / changed switching time. The status is not sent when the calendar is reactivated from the deactivated state. |
Import (CSV-File) and Import (CSV-Text):
The only difference is that in one of the CSV content is passed directly as a string and the other is the CSV content in the file passed as a string.
The CSV specifies one appointment per line. A line end is marked by "\ r". A line consists of the following through ";" separate information:
- Subject
- Description (If the description should contain line breaks, they must not be passed as "\ r \ n" but must be represented by _newline_, which will be replaced by "\ r \ n" in the description)
- Start (dd.mm.yyyy HH: MM: SS)
- End (dd.mm.yyyy HH: MM: SS)
- Calendar Output Name
- unique appointment ID (alpha-numeric). If no ID is used, an ID is automatically generated.
Example of CSV text: Subject; Description_newline_Text in the second line; 12.11.2018 17: 00: 00; 12.11.2018 17: 10: 00; Output001; 0815 \ r
Example for CSV file: C: \ Users \ Eisbaer \ Documents \ Alexander Maier GmbH \ EisBaer 3.0 \ Projektdaten \ Kalenderimport.csv
Setting "Do not delete existing appointments":
Tick not set: In the CSV not or no longer created appointments that already exist in the calendar remain unchanged.
Tick set: In the CSV not or no longer created appointments that already exist in the calendar are deleted!
Settings for the Exchange Import:
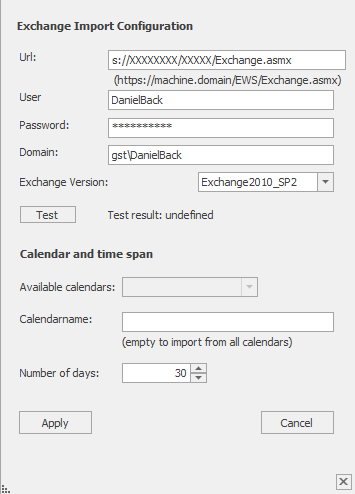
URL |
Enter the Exchange URL. Example: https: //server .../Exchange.asmx |
User |
Enter the user name that the user has on the Exchange. |
Password |
Enter the password for the Exchange user. |
Domain |
Enter the domain name of the Exchange server. |
Exchange Version |
Select the version of the Exchange server. The servers are downward compatible. |
Test |
The test establishes a connection to the Exchange and displays the calendars in the calendar list. |
Available calendars |
After the "Test" all available calendars are displayed here. By selecting the calendar will always be used for import. |
Calendar name |
Manual entry of the calendar name if no calendar was selected via the drop-down list. |
Days |
Specifies the time span of the appointments to be imported. The appointments from today to [set] days are imported. |
Prerequisite for use is that the use of EWS is allowed for the entire organization.
This is enabled with the command: Set-OrganizationConfig -EwsEnabled: $ true. Here is more information.
When using Office 365 (Microsoft Office - Cloud) via an Exchange gateway, please store the following settings:
https://outlook.office365.com/EWS/Exchange.asmx / Version Exchange2013_SP1 (specification of the domain is omitted).
Sample templates:
Download link: Holiday Calendar
General information about sample templates (SCADAComp):
Download the desired SCADAComp file and unzip the ZIP file into an empty folder. In the EisBär editor ribbon, select the "Import components" option under "Project" and load the template. If a conversion is necessary because the EisBär version is newer, confirm the process with YES. To retain functionality, select the "Create new networks" option as the copy rule when pasting.