The Calendar Editor is a visible component. It is used to display and operate the calendar.
To use the calendar editor, it must be connected to a calendar. It is possible to connect several calendar editors with one calendar, but not vice versa multiple calendars with a calendar editor. For this purpose, the data point "Calendar Editor" of the calendar component is connected to the data point "Calendar component" of the calendar editor.
This display can be changed via the WPF theme. The touch themes lead to display problems and should not be used.
Data points of the component
Name |
Type |
function |
|---|---|---|
Delete all Appointments |
Input |
An ON signal at this input cancels all appointments. No further prompt appears. Appointments from weekly calendars are not deleted! |
Lock operation (display only) |
Input |
If this input is not used, the component can basically be operated. If the input is connected with an on signal, the component can not be operated. It then only has display function. |
Go to today |
Input |
If this input is triggered, today's day will be focused and displayed. |
Show/hide extra ribbon group |
Input |
An OFF signal removes the "Extras" group from the display in the calendar. The display can be shown again with an ON signal. |
Show/hide import/export ribbon group |
Input |
An OFF signal removes the "Import/Export" group from the display in the calendar. The display can be shown again with an ON signal. |
Calender Component |
Bidirectional |
Connection between a calendar and one or more calendar editors. |
Set allow conflicts mode (on/off) |
Input |
With an on signal, schedule conflicts are allowed; with an off signal, conflicts are not allowed. |
Allow conflicts Mode |
Output |
Display for the conflict mode. |
Mouseover |
Output |
This output can be used to start an event when the object is moved by mouseover. |
Outlook Import |
Input |
Via this the appointments can be imported from the Outlook path. To assign the appointments to the EisBaer channels, the channel name must be entered in the Outlook appointment for "Location". |
Visible |
Input |
If this input is not used, the component is Visible. When used, the unvisible component is switched with an off signal and a Visible on signal.. |
Input |
Properties of the component
Name |
Default |
Function |
|---|---|---|
Lock operation only display |
|
If checked, the component only displays and cannot be operated. |
Activate Outlook Import |
|
If this function is set, the Outlook import function is available. |
Path to Outlook Calendar |
|
Select Outlook Calendar if the appointments are to be imported. (This process may take a longer time). Example: \max.mustermann@beispiel.deCalendar If there is no Outlook installed, the dialog will say "Outlook is not installed". |
Allow overlapping appointment |
|
This property can be used to set whether appointment conflicts (appointments with the same channel at overlapping times) are allowed or not. |
Show 'Import/Export' ribbon groups |
When enabled, the 'Import/Export' ribbon group is displayed. When disabled, the group is hidden. |
|
Show 'Extra' ribbon |
When enabled, the 'Delete All' ribbon group is displayed. When disabled, the group is hidden. |
Calendar menu bar

Appointment
By pressing "New appointment" or "New appointment series" in the menu bar, the popup for the appointment settings opens.
Also, to create a new appointment, double-click (long press in the app) on the day to be executed, in which the appointment is to be added. The "New Appointment" popup will appear. At the end of the dialog, leave the dialog with OK.
Edit appointment
To re-edit an appointment, it is opened by double-clicking (long in the app) on the entry in the calendar editor. If the appointment is a recurring appointment, the query will ask if the event (date that was clicked) or the entire series should be edited.
Delete appointment
To delete an appointment, it is opened by double-clicking (long in the app) on the entry in the calendar editor. If the appointment is a repetitive appointment (appointment series), the query is whether the event (date that was clicked) or the series is to be edited. Now you can delete the appointment or series via the "Delete" button.
Please note:
If "Send status" is active on the channel, an "Off" is always sent when deleting. If "Send status" is not active, the last status is retained.
Day I / Day II
In the Day II view, appointments lasting longer than 24 hours are shown separately above the shorter appointments. Thus, more space for the representation of the shorter is available.
Set working hours / working hours
For a better overview of the calendar, it is now possible to set the displayed range (from-to time). Set via Working time opens a dialog in which the beginning (time) and end (time) of the working time can be set. Working hours can then be used to scale the calendar to just the set working time.
Outlook import
Starts the Outlook import. In the import dialog that opens, the calendar to be imported must be selected. All appointments imported via Outlook are deleted and replaced by the newly imported appointments.
Manually created appointments and appointments imported via ICal are not deleted.
It should be noted that when importing a security query may appear (usually in the background). Only by confirming the message will the import be carried out.
iCal import
All iCal format events in an ics file are imported. All appointments imported via iCal will be deleted.
Manually created appointments and appointments imported via Outlook are not deleted.
If only one channel is created in the corresponding calendar, all imported appointments are automatically assigned to this channel. Thus, it is easy to create a holiday calendar.
In the download area on busbaer.de are holiday calendar templates as ics file or SCADAComp file with all public holidays in Germany, which are valid in more than 2 states.
Further holiday and holiday calendars are available for download at schulferien.org or feiertage-deutschland.de.
iCal export
All appointments created in the calendar are exported. A reimport preserves the channel mappings. When importing into another calendar, all channels must be present, otherwise the import will be aborted.
Meeting-Editor (example for normal-mode)
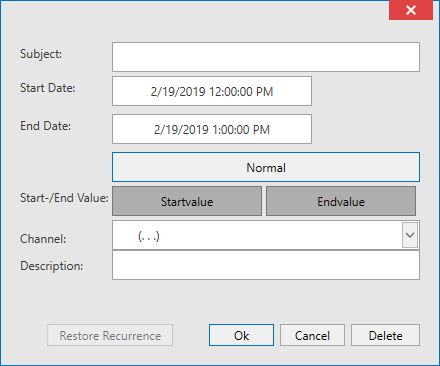
The "Back to series" button is active when an appointment has been moved from a recurring appointment to a single appointment. The button returns the "single date" back to the appointment series.
Subject
Enter an explanation of the appointment here. It should describe the task of the appointment. It is sent to the associated data point at the start time. At the end time, the text is deleted.
Start value
At this date we sent the start value from the calendar.
End value
At this date, the end value is sent from the calendar.
Normal / Series
By pressing the button, you can switch between normal and serial appointments. If "Normal" is selected, this appointment will only be executed once. If "Series" is selected, you can choose between different repeat series. Selection includes daily, weekly, monthly and yearly series.
In addition to the series type and its serial settings, an expiration date can be defined for each series. Here you can choose between a number of executions of the event or an end date for the last execution.
Send start / end value
These parameters are set by default and cause the calendar component to trigger a circuit at the start or end date. For example, if you want to turn on an illumination for an appointment and then switch it off again, both parameters must be set. If, however, only one channel activation is to be carried out, the parameter Send end value must be deactivated. This way, channels can be switched on, but switched off manually.
channel
Here are the channels created in the calendar for selection.
description
If a description is to be displayed for the appointment, this can be added here. This can be used by the user for a better understanding of the executed switching function.
Sample templates:
Download link: Holiday Calendar
General information about sample templates (SCADAComp):
Download the desired SCADAComp file and unzip the ZIP file into an empty folder. In the EisBär editor ribbon, select the "Import components" option under "Project" and load the template. If a conversion is necessary because the EisBär version is newer, confirm the process with YES. To retain functionality, select the "Create new networks" option as the copy rule when pasting.