Instructions for setting up a Mobotix door communication system in the EisBaer SCADA
Requirements:
The Mobotix door station must not be set up for MXEasy.
(1) IP of Mobotix is 192.168.100.16
(2) Mobotix enabled as SIP server, with port 5061
(3) Mobotix registers itself with the registration name 201 as a SIP client on the SIP server.
(4) The EisBar is registered on the Mobotix SIP server with registration name 200.
Under these conditions, the door intercoms function component.
Properties
Name |
Standard |
function |
|---|---|---|
Registration Required |
x |
If the check mark is set, the video door station must be registered with the proxy (switchboard / exchange) with name and password. |
Display Name |
200 |
Any name that is displayed when connecting to the remote station. |
User Name |
200 |
Name of the user in the server domain. Mostly identical to the registration name. |
Register Name |
200 |
Name for registration at the proxy. |
Password |
200 |
Password for registration at the proxy server (switchboard / exchange). |
Domain Server Host |
192.168.100.16 |
Domain of the Proxy, sometimes referred to as Realm. In many cases, the IP address of the proxy is also entered here. |
Proxy IP |
192.168.100.16:5061 |
IP address of the proxy server (switchboard / exchange). |
Proxy Port |
5060 |
SIP port of the proxy server for registration. |
DTMF Key |
1 |
DTMF signal tone sent to open the door. |
DTMF Light |
2 |
DTMF signal tone sent to switch the lighting. |
Number |
201 |
Internal number or name of the station on the proxy server (switchboard / exchange). |
IP Camera URL/Pfad zum MJPG-Stream |
|
URL / path to the MJPG stream in the IP camera, e.g. http: // <IP> / <xxxx.mjpg path /> |
IP Camera User Name |
|
Username to log in to the camera if anonymous access is not possible. |
IP Camera Password |
|
Password of the user to log in to the camera. |
IP Camera Pictures per Second (0-20) |
5 |
Refresh rate of the image display. The set number of pictures of the camera is displayed, per second. 0 = speed of IP camera |
Preamble:
To deactivate the onscreen displays in the SIP video, the following settings must be adjusted in the Mobotix door station.
Admin Menu> Configuration> Edit>
VOIPMENUAUTOHIDE = On (put on on)
VOIPMENUHIDETIMEOUT = 1 (set to 1 or insert completely if not present)
Setting up the SIP communication in the Mobotix door station:
First, the SIP server must be set (in the Admin menu). All SIP clients that are to establish a connection must be set up (for example, EisBaer Client 1, EisBaer Client 2, EisBaer App, door intercom, ...)
After setting the settings, it is possible to register the EisBaer at the Mobotix door station (Registration Succeeded).
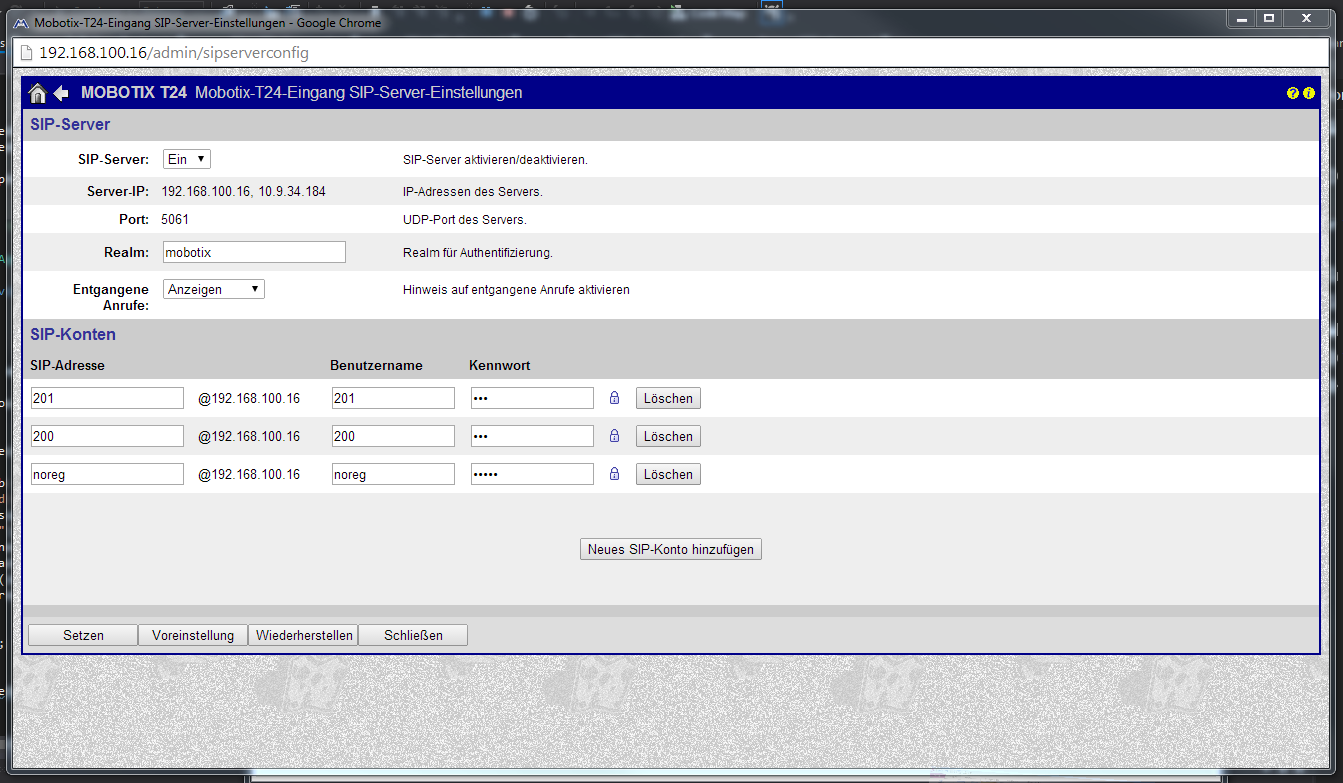
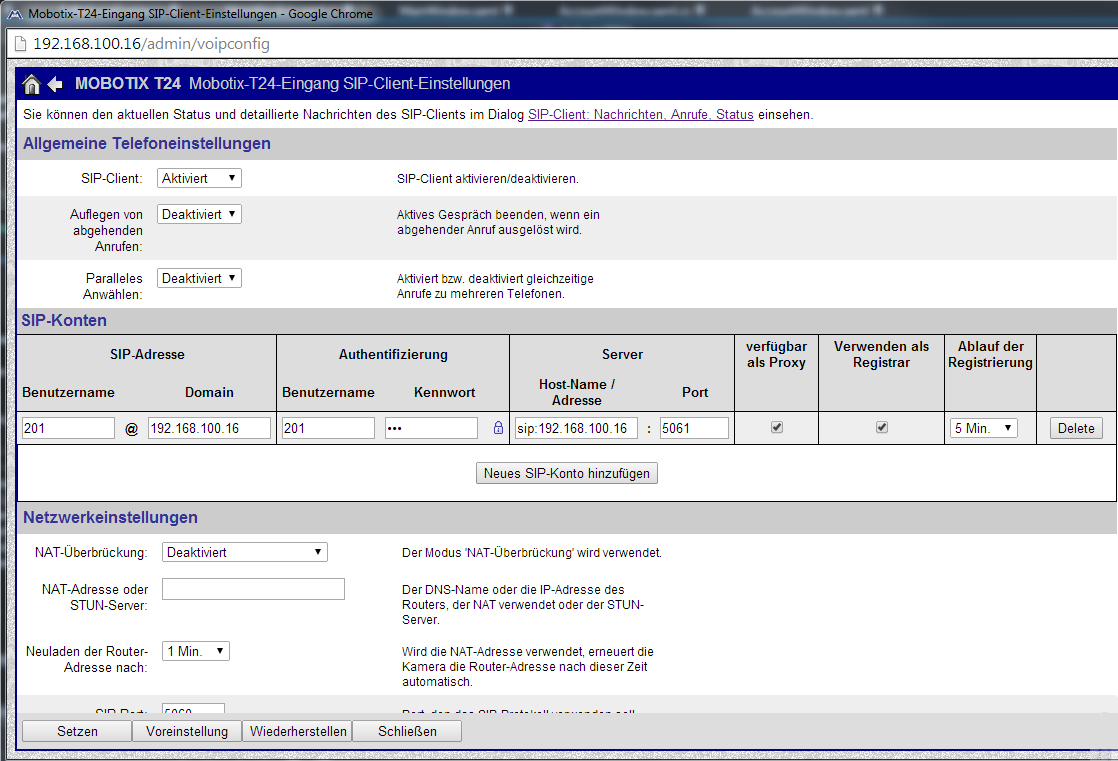
Then the SIP client must be set up (in the Admin menu). The door intercom can be reached under this user name.
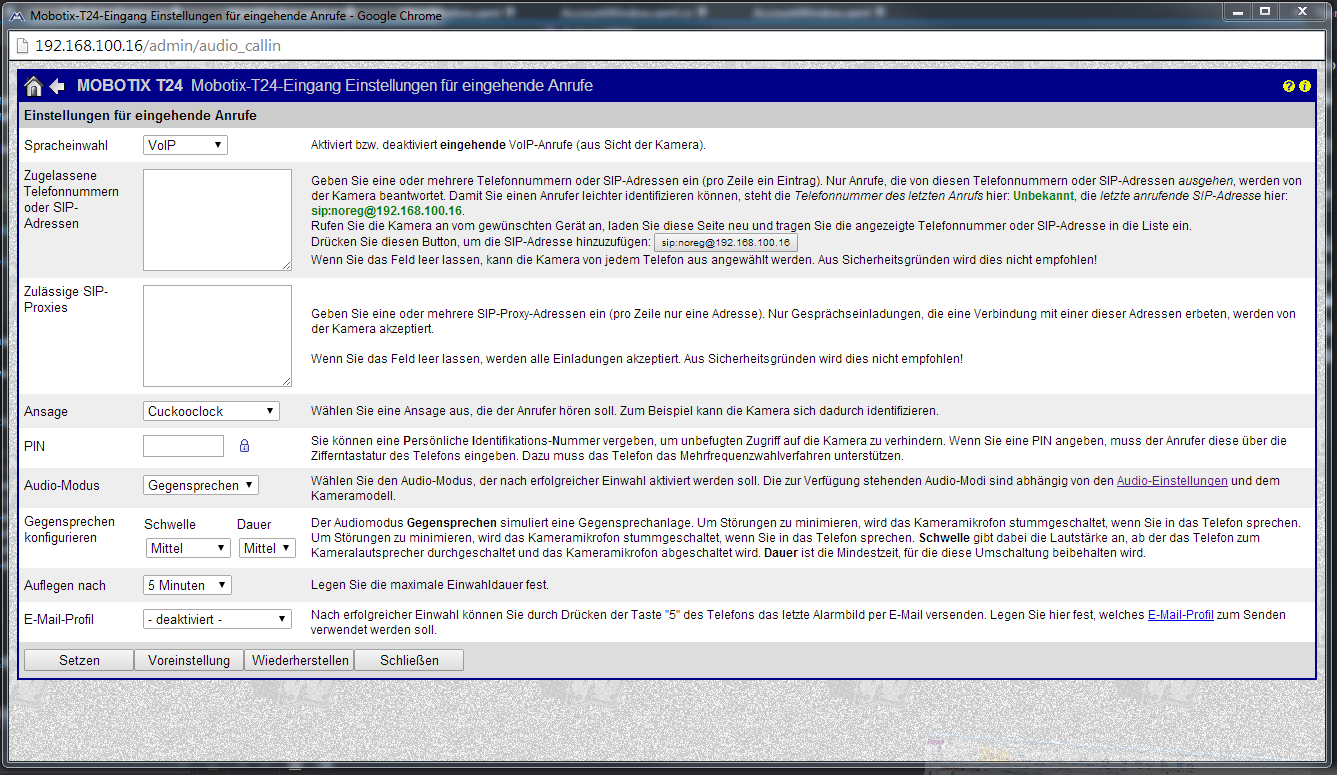
Under Settings for incoming calls (in the Admin menu), all SIP addresses that are allowed to call the door station must be entered.
The voice dial-in is to be set to VoiP.
After setting the settings, it is possible to call the Mobotix door station with the EisBaer.
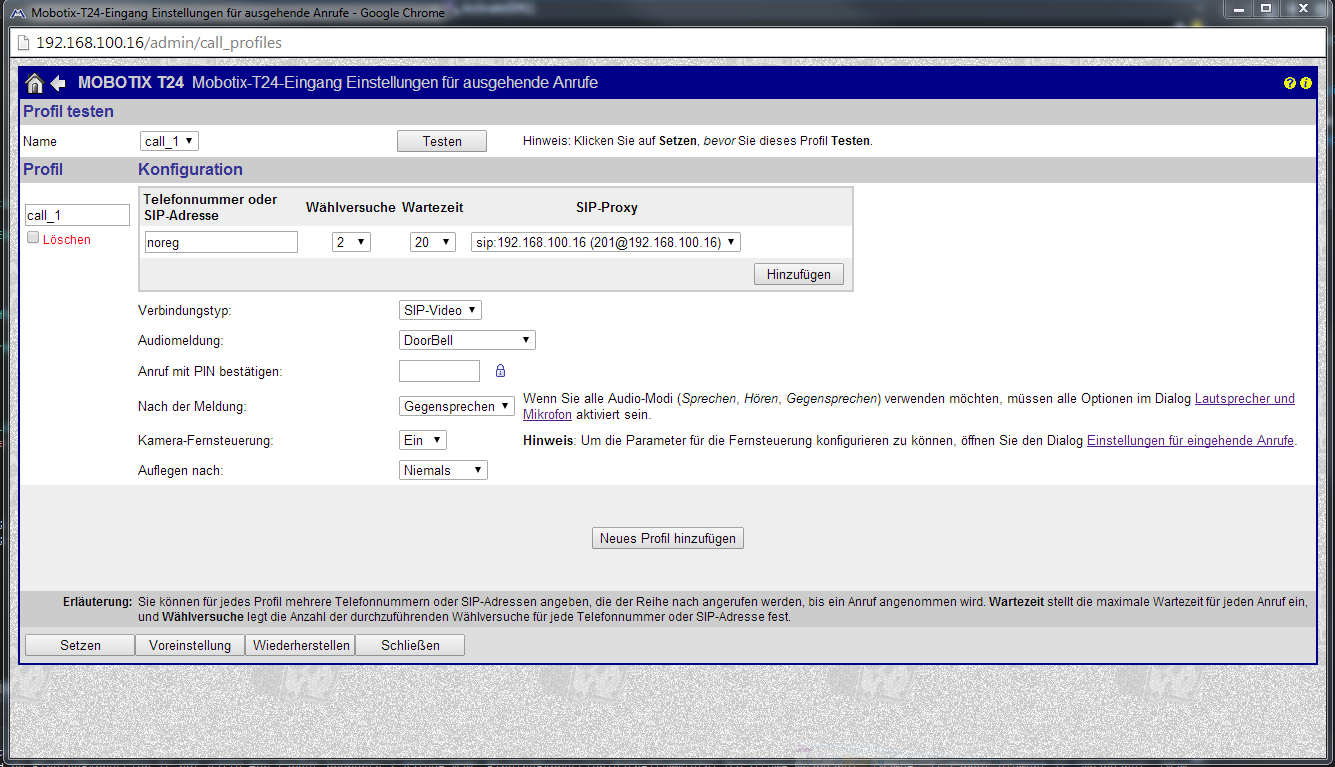
In order to be able to call a remote station with the door station, the outgoing call must be configured (in the Admin menu). The specified profile name must be on the
next page in the action groups.
After setting the settings, it is possible with the "testing" to call the EisBaeren.
To trigger a call with a key, it must first be assigned to an action group (in the setup menu). If the key (event selection) is grayed out, it must be activated beforehand.
Under Action the previously created outgoing call is connected.
After setting the settings, it is possible to call the EisBaeren with the button set under Event Selection.
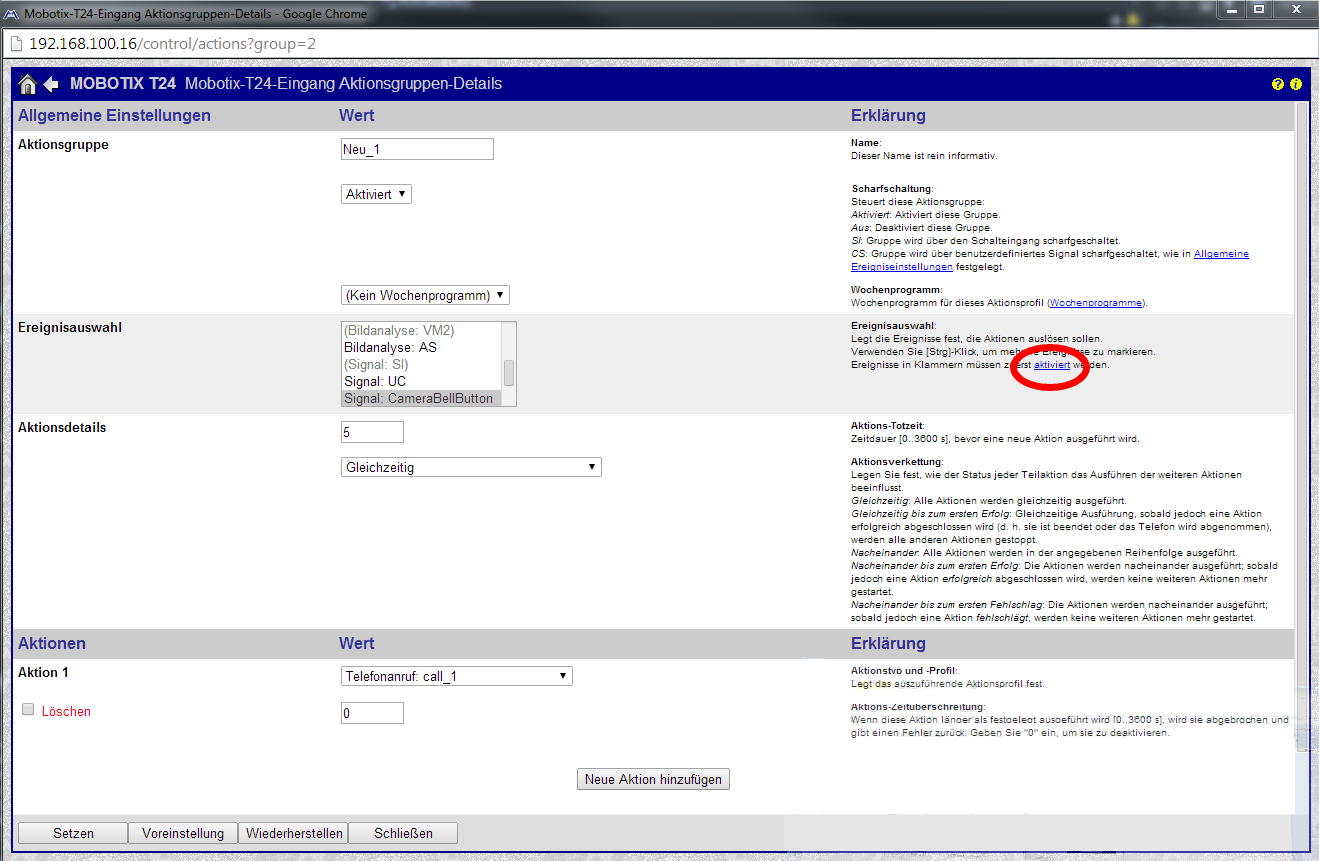
Finally, all settings must be written to permanent memory. This can be done when closing the settings menus or in the admin menu.
Configuration examples for the EisBaer Smart Clients (App)
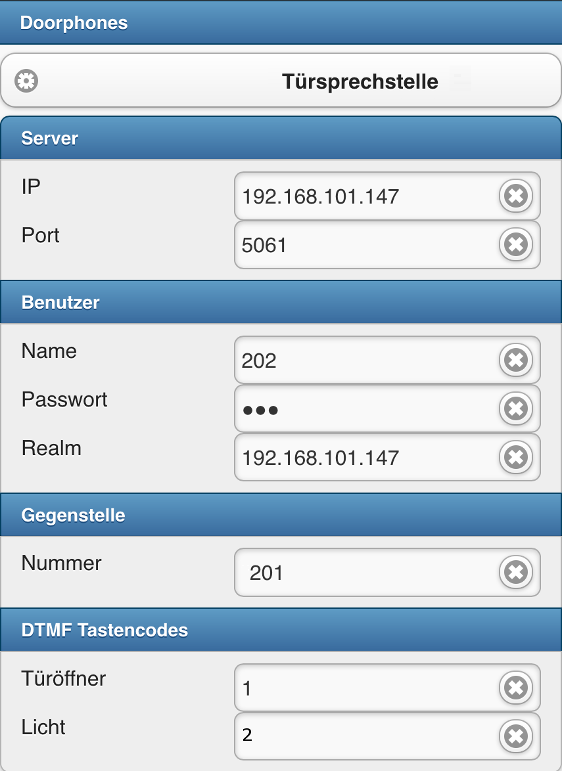
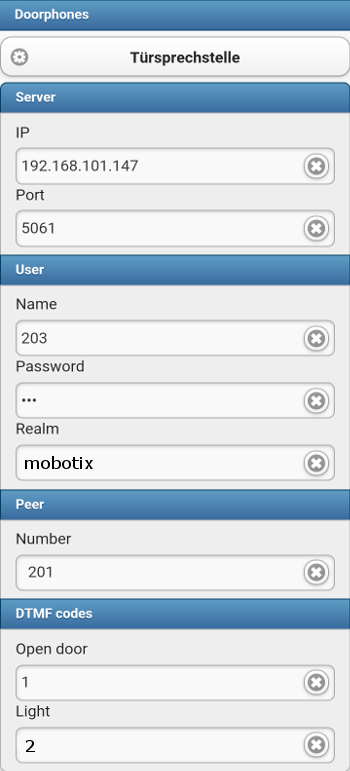
Entries are to be adapted to the configuration of the door station.
IOS App Door Phones Settings |
Android App Door Phones Settings |
In the IOS app, the IP address of the door station must be entered at Realm. |
In the Android app, the realm name specified in the SIP server must be entered in Realm. |
|
|
The settings are only saved after leaving the settings dialogs. To transfer the data, you have to switch to the settings dialog and then to the home menu. If there are several existing servers, select the desired server.