The Scenarios Editor is a Visible Client component. It is used to display and operate the scenario component.
Via "WPF-Theme" the appearance of this component can be varied.
To use the scenario editor, it must be connected to a scenario building block. It is possible to connect multiple scenarios editors with one scenario building block, but not vice versa multiple scenarios with a scenario editor.
If subsequent channels are added to the Scenario component, they must be activated in the Polar Bear client as follows.
- Each scene must be called in the EisBaer client.
- Copy the name of the scene to the clipboard.
- Delete scene.
- Save the scene again.
- Paste scene names from the clipboard
The scene is recreated with the same number and has integrated the newly created channels.
Update all other scenes according to this scheme.
Data points of the component
Name |
Type |
function |
Lock operation (display only) |
Input |
If this input is not used, the component can basically be operated. If the input is connected with an on signal, the component can not be operated. It then only has display function. |
Mouseover |
Output |
This output can be used to start an event when the object is moved by mouseover. |
Visible |
Input |
If this input is not used, the component is Visible. When used, the unvisible component is switched with an off signal and a Visible on signal. |
Scenarios Component |
Bidirectional |
Connection between a calendar and one or more scenarios editors. |
Input |
Client-Ansicht
|
|---|
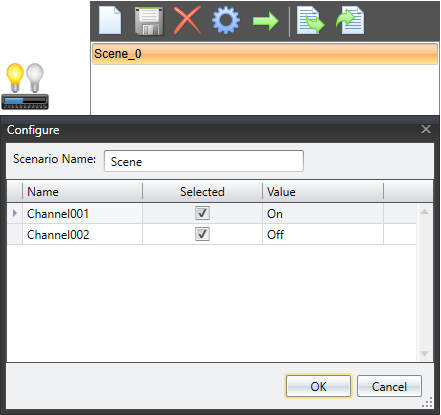
Meaning of the icons (from left to right):
New scene (sheet)
Insert new scenes via this icon. When creating, all channels from the channel list are displayed. If you do not want to add all channels to the new scene, deactivate the corresponding channel with the parameter checkbox "Selected". The Value column displays the current values of the channels. They can also be changed in the Value field. If no value exists, you can preset this here. Please make sure to select only values that match the connected data points of the bus system.
Save scene (floppy disk)
First, select the scene to save in the list. Now you can press the memory button. The current values of the channels are saved.
ATTENTION: The selection of the channels within the scene is set according to the states at the ignore data points. If the data points are not linked, all channels are set to "Selected" when saving.
Delete scene (X)
First, select the scene to be deleted in the list. Now you can press the delete button. The scene and its data are deleted.
Settings (gear)
First, the scene to be edited in the list is selected. The Settings button opens the Settings window. It will show the channels with their settings. Each channel is set whether this is used in the scene (Selected) or not. The value to be sent is set under Value. With OK the changes are saved.
Call scene (arrow)
First, select the scene to be recalled in the list. Now you can press the call button. The scene with its stored values is triggered.
export
Attention: ONLY POSSIBLE ON THE SERVER.
Press the export button to export the entire settings of the scenario module to an external xml file. This function is used to back up the programming. The default path is ...\Documents\Alexander Maier GmbH\EisBaer 3.0\Export.
import
Attention: all existing scenes will be overwritten.
Press the Import button to import the scenario block settings from an external xml file. Here, the file must be imported without the addition "_Channels". The scenes are now displayed in the editor and the dynamical folder containing the data points is created in the unVisible component.
It is also possible to import EisBaer 1 light scene data (* .CSV). These must first be exported to a CSV file in the EisBaer 1 Light Scene Editor. To view the imported scenes, the simulation must be stopped and restarted.