General
This component can be used to receive asynchronous SNMP traps and to output the associated values. The traps can be defined individually. The traps are assigned to "device classes", whereby it can be defined for each class which trap version and, if necessary, credentials are to be used.
Since there can be several devices in the network from one device class (eg an APC UPS), which can all trigger the same trap, an additional SP output is generated for each trap besides the actual SP output, via which the source of the trap ( IP address) is output.
Properties
The component can be configured via the properties.
Name |
|
function |
|---|---|---|
Channels |
0 |
Here you can define the traps that should be received and output. |
Security Engine ID |
|
For v3 traps, a selectable engine ID is used for encryption. This must be set globally - it may be necessary to ensure that the trap transmitters are adapted accordingly. |
Local IP |
|
Here, the IP address of the local network interface to be used is entered. |
Local Port |
162 |
Here you enter the local port to be used by the agent component. |
Driver On/Off |
|
This can be used to set whether the component should be active when the system is started. |
Channels
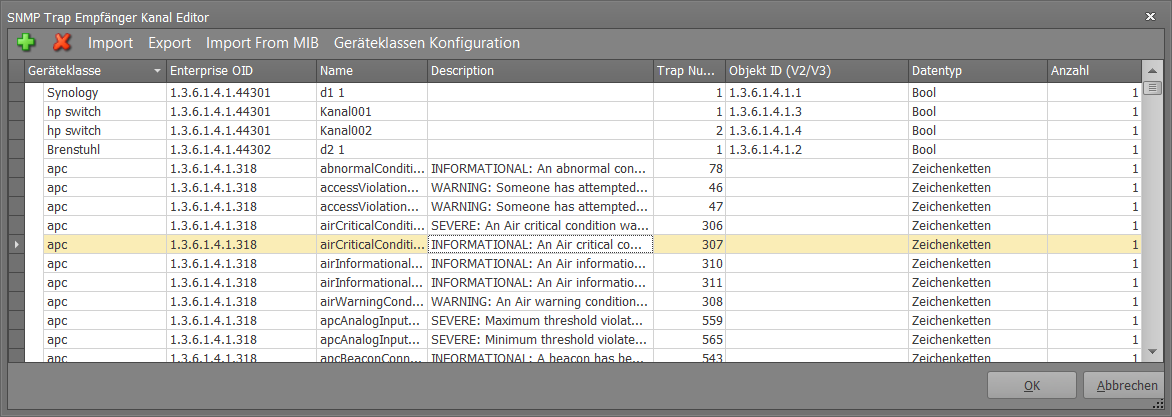
Picture : Properties – Traps
Here you can define the traps that should be received and output. First, it is important to specify a device class (can be freely named). The assignment of an Enterprise OID belonging to this device class is done via the "Device Class Configuration" - the OID is then also displayed here. In addition to the name of the trap, a description can also be given here. The specification of the trap number is only relevant if SNMP version 1 is set for the corresponding device class. Furthermore, the trap-specific object ID (relevant for trap version v2 / 3) and the data type of the trap value can be defined. For traps that contain multiple variables (such as the TrabAgent's built-in EisBar info trap), you can specify how many variables there are. There are then created correspondingly many SPs.
If traps are defined via an MIB import ("Import MIB"), the names, description and trap number / OID are entered automatically if necessary.
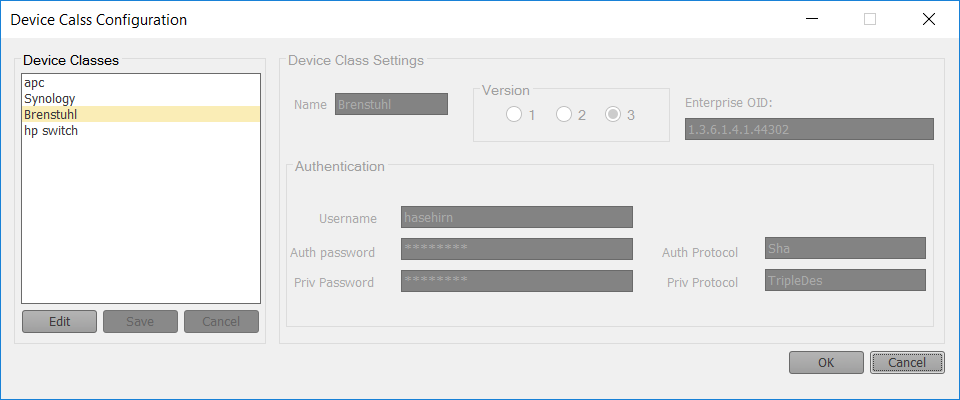
In the dialog for configuring the device classes, the classes can be selected in a list and, if necessary, edited using "Edit". Here you can set the SNMP version and related information and also rename the device class.
The changes must be saved explicitly with "Save" before leaving the dialog.
Shared-Properties
Name |
Type |
Function |
|---|---|---|
All Trap Messages |
Output |
All received traps are output here. |
Debug [Text] |
Output |
Error messages are displayed here. The diagnostic information is displayed there, linked to the [Signal] input of the log window. |
Driver On/Off |
Bidirectional |
Switch driver On/Off |
Dynamic |
Folder |
Contains the data points of the created channels |
- Channel001 |
Output |
Here, the associated value inputs are created for each defined trap. If a value is sent to the component via one of these SPs, a corresponding trap with the received value is generated as content and sent to the defined trap receiver. |
- Channel001 Source |
|
The IP address of the transmitter is output here. |
Driver Datapoints:
The data point window displays all SPs and the corresponding object ID and trap number.