 EisBaer 4.0 - Server console
The EisBaer Server runs as a system service on the installed computer. The service is preset to "Automatic (Delayed Start)", i.e. when the computer is started, the EisBaer Server is automatically started with a delay of approx. 2 minutes. This also happens without user login. The delayed start is necessary to establish the network connection before the EisBaer service starts.
Messages related to the EisBaer Server are stored in the Windows Event Viewer under Windows Logs\Application. EisbaerServerWindowsService is used as the source.
Note: For virtual environments, please refer to the notes in the USB Dongle Serverchapter .
Solution:
The EisBaer server service is set up using the EisBaer - Server configuration console. Administrator rights are required to open the console. Settings in the console are only possible when the service is stopped.
Name |
Description |
|---|---|
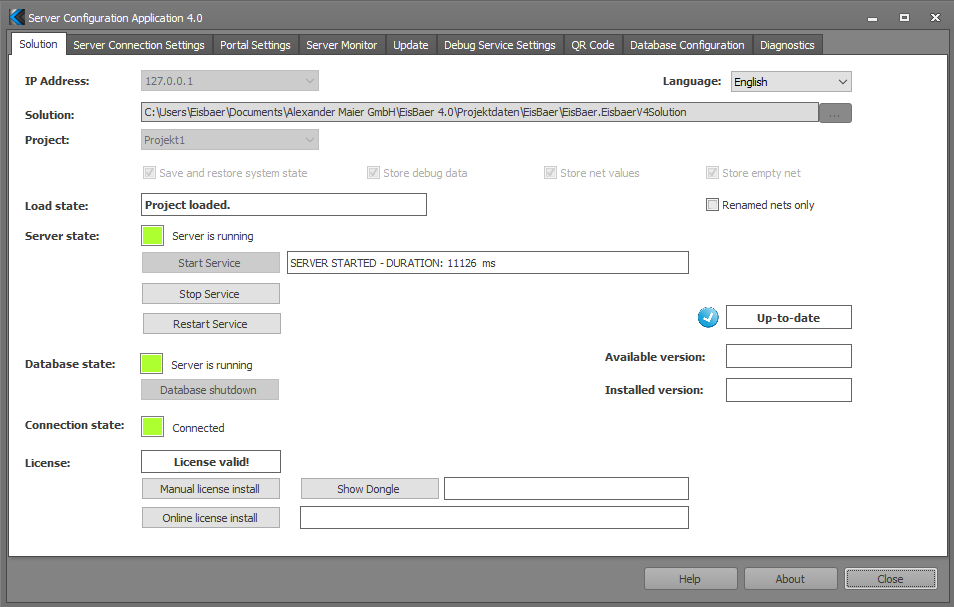
IP address |
A fixed IP address must be set in the server PC so that the clients (Windows, WebApp and MobileApp) can access the server at any time. If the server and the client are the same machine and no other clients are needed, the IP 127.0.0.1 (local host) can also be set. However, this will not allow any other client to reach the server. |
Folder / Project |
Storage path to the project that the service is to load. For Project, the ".EisbaerV4Solution" file of the project is selected. |
Save and load system state |
If this option is set, the last state of the components will be loaded after a restart of the service. Without, all components are displayed with their "undefined" state. |
Save network values |
In addition to the status of the components, the values of the networks can also be saved. This also allows a status to be processed further by the network. |
Debug data storage |
The debug memory must be active for the function of resetting the visualisation to a specific point in time. |
Save empty networks |
This additionally records all networks with a data point. This means that historical network values can be called up using the DS function of the plotter even though they are not visualised. |
Only renamed networks |
Only network values of renamed networks are saved, manually or via the right-click menu. This reduces the amount of data recorded and only the desired values are displayed for analysis. |
Load status / Server status |
There are 3 states: Server is not started, Start pending and Server is started. If the server is not started (project not loaded), the visualisation cannot be displayed in the client. If the service is started by pressing the "Start service" button and the project is loaded, the status changes to "Start pending". Next to it, the steps carried out until the start are displayed. This process must not be interrupted. When the server is ready, the display changes to "Project loaded". Projects are automatically updated to the installed EisBaer version when the EisBaer service is started, provided the project status was created with an older EisBaer version. A backup copy is created in the project folder under the name ../Backup (ZIP file). This function is identical in the EisBaer Editor. Stop Service unloads the project again. Restart Service restarts the service. The behaviour is the same as with Stop and Start Service. |
Database status |
When the server service is started, databases are initialised and loaded. The status is displayed here. |
Connection status |
Shows whether the server console is connected to the service itself. |
Licence |
Shows whether the licence is valid or not. The licence file can also be downloaded here. No further action is then required. Alternative manual installation: Install the "Eisbaer.EisW" file via the "Install licence" button; to do this, select the file type *.*. Use Show Dongle to display the licence number. |
Server Ports:
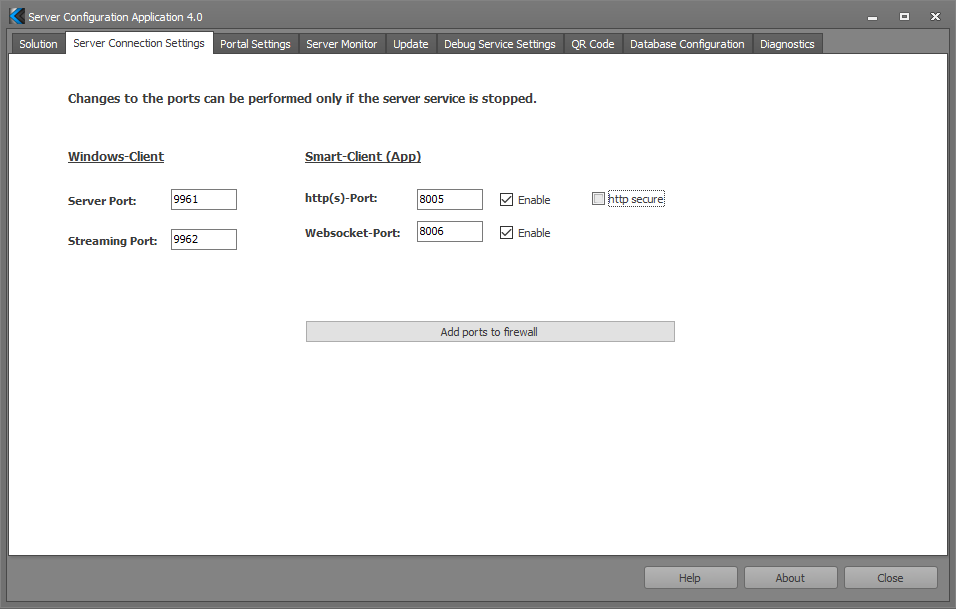
The Windows client ports are responsible for access by the EisBaer Windows client. The download port is also used for uploading and downloading in the EisBaer Editor. If changes are made, these ports must also be changed in the Windows client and in the Editor.
Smart client ports are responsible for accessing the EisBaer mobile apps under IOS or Android. In addition, they are used for WebApp/HTML access via web browser.
The ports are automatically entered/enabled in the firewall during installation. If changes are made, they must be configured in the firewall or port forwarding, etc.
HTTPS can be activated to obtain an encrypted transmission. The EisBaer standard certificate is used. However, own certificates can also be used. The thumbprint must be specified for this.
Notice:
The EisBaer service requires ports 808 and 3702 as "Lisener" and "Discovery" port for the client/server search. Without port 808 the service cannot be started and without 3702 no client will find the server via the search. All ports that are entered in the firewall are listed under Software Setup.
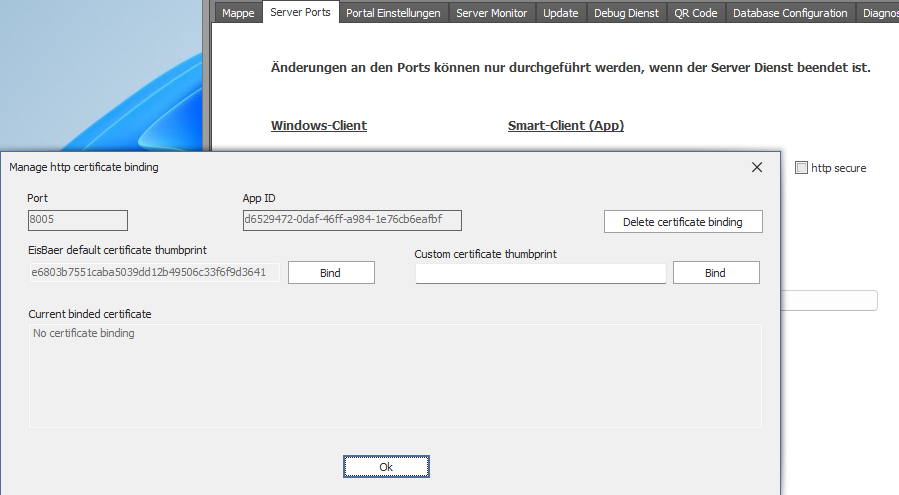
http secure must be activated in order to use encrypted transmission. Clicking on "http secure" opens the dialogue for integrating the certificate. There is a self-signed "EisBaer default certificate". Alternatively, you can use your own private certificates (with key icon). To do this, the fingerprint/thumbprint of the certificate used must be entered. After pressing the "Bind" button, it is displayed whether the binding was successful.
Alternative control via the Windows command prompt (cmd): e.g. netsh http show sslcert ipport=0.0.0.0:8003
To retrieve the fingerprint/thumbprint of a certificate
1. open "Manage computer certificates"
2. click on Certificates (Local computer) in the left area of the Console root window
3. click on the My/Personal certificates folder to expand it. The certificate must be installed here.
4. Click on the Certificates folder to expand it.
5. search for your certificate in the list of certificates. The "Intended purpose" column must contain "Server authentication". 6.
6. double-click on the certificate.
7. click on the Details tab in the Certificate dialogue box
8. move the contents of the field list and click Fingerprint
9. copy the hexadecimal characters from the field (Ctrl-C).

The portal server connection is described inthe chapter Portal server. If there is no portal access, the autostart must be deactivated.
Server Monitor:
All clients that are connected to the EisBaer server service can be displayed in the server monitor. The display consists of the computer name and its IP address.
All network communications are recorded via "Start net traffic monitor". The display consists of the time stamp, network name, internal number and the value that was sent to the network.
Update:
This tab displays the current and available EisBaer version. Via "Show Changelog" all new features of the EisBaer versions are displayed. At the end of the changelog are the download links for the previous EisBaer versions.
If a newer version is found after "Check for updates", it can be downloaded and installed.
Debug service:
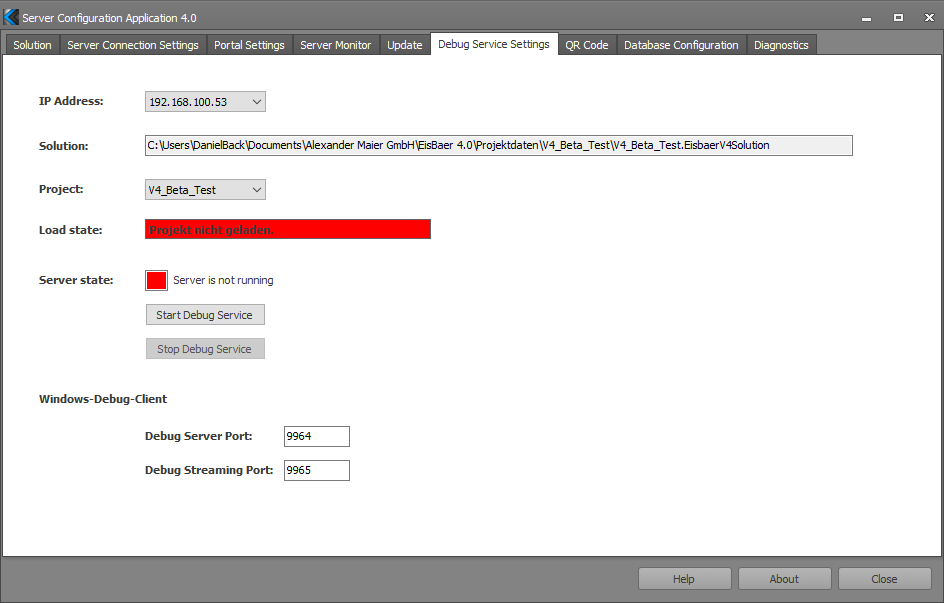
This service starts the selected project in debug mode. This makes it possible to load the project with the client (Attention: other ports!) and to display the status of the system at certain times. However, this is not required for the regular operation of the project.
QR code:
Display of the QR code to take over the connection data with the Android or iOS app. This only needs to be scanned when changing the IP address or the ports. Not when changing the polar bear project.
Database Configuration:
Expert settings!
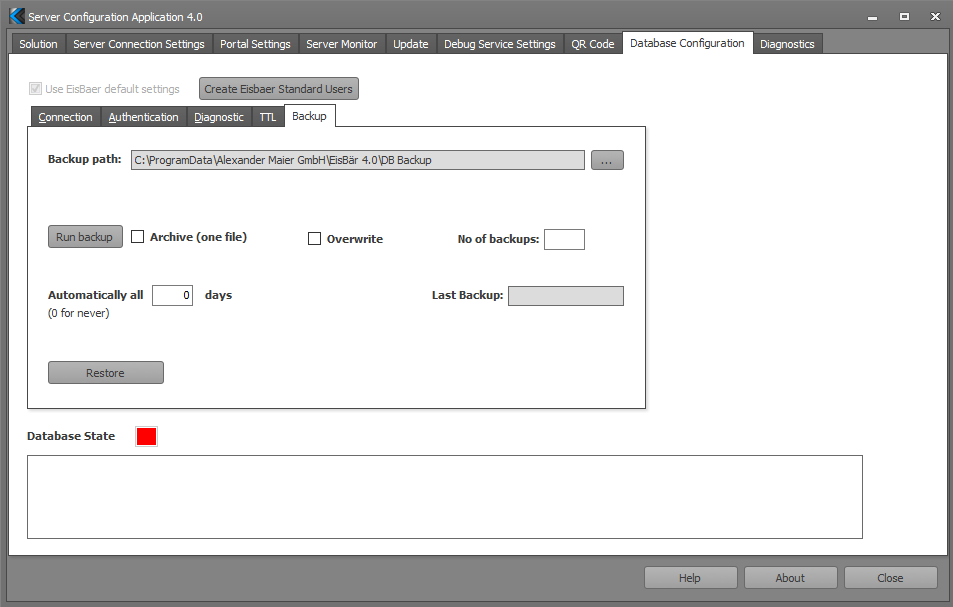
A backup routine for the database can be set in the Backup tab. The save time is at midnight
"As one file" means that the entire backup is stored in an archive - i.e. there is only one file.
If 'Archive' is not selected, the backup consists of many files, i.e. each collection, each index etc. is saved as a separate file.
If "Overwrite" is selected, the last backup is always overwritten and no timestamp is appended to the file or directory name. If "Overwrite" is not active, the backup is not overwritten and a time stamp is appended to the names. If there are more than the set number of backups, the oldest ones are deleted.
If "Number of backups" is 0 - everything is cancelled.
Diagnosis:
Server logging can be activated in the Diagnosis tab. Activate only in the event of an error and after consulting the support team! Below this is the selection for the storage location and the log level.
In addition, the installation of the EisBaer Dongle Fix and the KNX USB Fix is possible here. This changes the energy saving settings of Windows 10 to allow permanent access to KNX/USB interfaces.
DB logging can be activated to create a log file of the Mongo database. The log file is stored in the project folder \PRJ0001\DBs\log\.
MongoDB external user Login:
User: Extern
Password: gNNMn05w