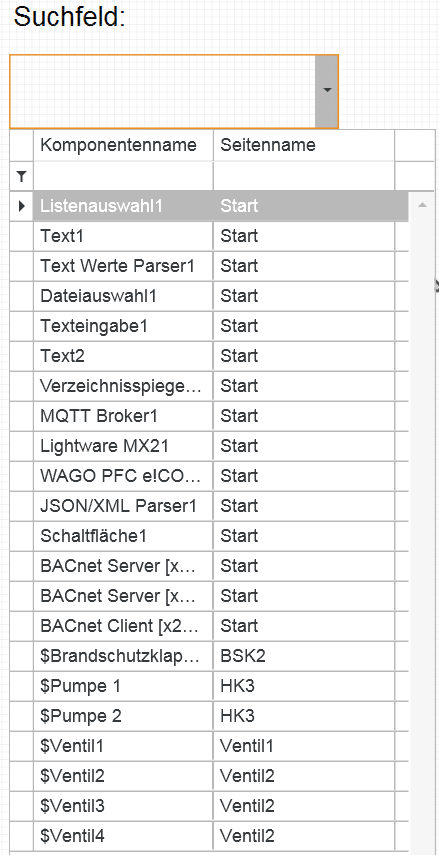
This component has several functions.
- Table mode: Send a specific value from a list
- Search components mode: Search for components in the project and switch to the component page.
- OCPP charging point data: Duplicate charging station DLM, use OCPP component (known station names)
- Charging history (OCPP / DLM): Select historical data originating from the OCPP or DLM component.
- Debugger diagnostics: route several diagnostic outputs from components to a log window
Data points of the component
Name |
Type |
Function |
|---|---|---|
Selected value |
Output |
The line selected in the dropdown is output here. In the "Search component" mode, the data point "Page change by name" from the Page selectioncomponent is linked here. |
Selected value (pre-selection) |
Output |
The line selected in the dropdown is output here, even if the entry has not yet been confirmed. This switches the output even if an entry is only selected (e.g. using the arrow keys) |
Lock operation (display only) |
Input |
If this input is not used, the component can always be operated. If the input is connected with an on signal, the component cannot be operated. It then only has a display function. |
Data import [csv] |
Input |
A CSV file is imported here via the"File selection" component. |
Import data from string |
Input |
Data can be imported directly here, e.g. from the OCPP component (active charging stations). |
Search KNX interfaces |
Input |
This data point is only visible if the "Scan KNX interface" property is active. With an On signal, all available KNX interfaces (IP and USB) are searched for and entered in the list. If a connection is selected, the configuration can be adopted on the KNX driver "Change generic configuration". |
Mouse via |
Output |
This output can be used to start an event when the mouse is moved over the object. |
Visible |
Input |
An off signal makes the component invisible and an on signal makes it visible. |
Text colour [ARGB-HEX] |
Input |
|
Input |
||
Select line |
Input |
A number can be used to select a specific line from the list. |
Select value |
Input |
A text can be used to select a specific value from the list for display. |
Properties of the component
Name |
Standard |
Function |
|---|---|---|
Separator |
Tabulator |
Column separator: Tab, Semicolon, Comma |
Show Add New Dialog |
x |
If this property is activated, new entries can be created in the client. For this purpose, a dialogue opens after entering a new text in the search field. |
Store Table Data |
x |
All data is saved in the database so that the contents are retained after a restart. When importing data from strings coming from the OCPP, this property must be deactivated, as this information is generated dynamically by the OCPP. |
Scan Knx interface |
|
This property makes the data point of the same name visible in the communication window. |
Set 'Search components' mode |
|
If this option is selected, all components and the page on which they are located are displayed in the list. |
Component filter |
|
A search filter can be entered here. |
Table mode |
|---|
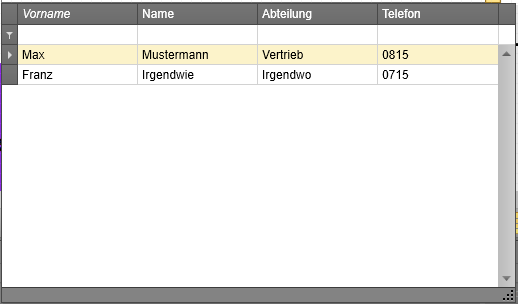
The first line is used to label the table and the others are assigned accordingly. If a row is selected with a mouse click, the entry in the last column is displayed at the "Selected value" output. In the component, the entry in the second column is displayed as a reference.
Example of a table: First name Last name Department Phone Max Mustermann Sales 0815 Franz Somehow Somewhere 0715
This is written using a text editor or WordPad, for example, and must be saved as a CSV file. Tabs must be used to separate the columns. The table must be imported in the EisBaer Windows client! This is not possible in the editor. For the import, the file path of the CSV file must be transferred as text to the data point "Data import [csv]", e.g. with the file selection component. The component then loads the data from the CSV file and displays it.
There is an "empty entry" in the selection window, which serves as a search in the corresponding column. Filters can also be set in the header. |
|
Sample templates:
Download link: List selection (unzip CSV file into the folder c:\Eisbaer)
General information on sample templates (SCADAComp):
Download the desired SCADAComp file and unzip the ZIP file in an empty folder. Start the "Import components" option in the EisBaer Editor ribbon under Project and load the template. If a conversion is necessary because the EisBaer version is newer, confirm the process with YES. To maintain the functionality, select the option: "Create new nets" as a copy rule when pasting.
Search components mode |
|---|
For this function, you must link the "Selected value" data point of the list selection with the "Page change by name" data point of the page selection.
You can use the list selection in "Search components" mode to search for a component (e.g. light corridor) in the project at runtime. To do this, the name you are looking for is written to the list selection. If you then click on the line with the component name, the client jumps to the corresponding page on which the component you are looking for is located.
As the component name is used for the search, it must be uniquely assigned to the components to be searched for.
Component filter: If no character is entered, all components of the project are shown in the list with their names. Components that are located on a master page are not displayed. If only certain components are to be displayed, these names can begin with a search filter, e.g. $, and the filter can be set to $. This means that only the $name components are listed. The $ is then no longer displayed in the list. |
|