The KNX driver is an invisible server component with the possibility to control an EIB/KNX installation.
For each project, a KNX connection for an EIB/KNX installation is inserted on any page. Preferably, the component should be inserted on a separate system page. It is possible to combine several KNX installations, which are not physically connected to each other, in one EisBaer visualization. For this purpose, a KNX component is inserted for each installation and set according to the respective ETS project.
Information on using dummy devices for filter table calculation can be found in the chapter KNX Dummy / Filter Table
Before activating the driver, the data points (group addresses and device data) must be imported via the "Data point list" dialog. The dialog also opens by double-clicking on component in the workspace.
From Windows 8.1 and higher, these instructions must be observed. I
ATTENTION: Deleting the KNX connection results in the loss of all connections in the polar bear project. All connections must be created again by hand.
Note: If the physical address of bus devices is changed, it is necessary to delete the data points with the affected addresses in the KNX driver, since the networking within the project is based on the physical addresses and the device objects. Afterwards, the networking of these data points must be established again.
Driver settings
KNXnet/IP and USB drivers have two integrated driver layers, the KNX Falcon driver and our own driver. The Falcon driver is activated by default. Some older KNX interfaces do not support the Falcon driver; our driver must be set for these.
The KNXnet/IP protocol offers two connection options. A unicast tunnelling connection and a multicast routing connection. With the unicast tunnelling connection, only one KNX/IP interface is accessed at a time. With the multicast routing connection, several remote stations can communicate with each other. These can be several KNX/IP routers, PCs, touch screens, etc. Within a computer, only one application is possible at a time, as 2 applications would otherwise access the same network port.
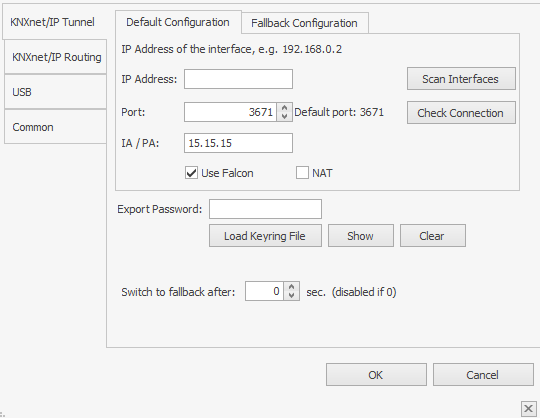
KNXnet/IP tunnel (with and without Falcon):
We recommend the tunnel connection. With this, a connection failure is recognised and reported.
The IP address and correct KNX address of the selected KNX/IP interface (or tunnel channel) must be set. The IP address must be entered without a leading "0". The"Scan interfaces" button can be used to search for and set all KNX/IP interfaces available in the local network. For secure systems, the correct KNX address and keys must be set, see chapter IP Secure and Data Secure. The connection to the KNX/IP interface is checked with "Check connection". The encryption is also checked for secure connections.
"NAT" is only required for KNX/IP interfaces behind a NAT router. In most cases, it is not required.
The Falcon driver layer, "Scan interface" and Secure are deactivated by unchecking the "Falcon" box. An older driver is activated. This should only be used if a connection via Falcon is not possible.
The interruption of the tunnel connection is recognised by the Falcon driver. In addition, a heartbeat command is sent every minute. If the driver detects an interruption in the network connection or the KNX wiring, the driver goes offline and attempts to re-establish the connection. At the same time, this is signalled via the "Driver status" data point. When the connection is re-established, the driver automatically goes online and queries the statuses if necessary (if "Read values from KNX" is activated).
The interval and the group addresses can be set. Setting the interval to 0 deactivates sending.
The address must be a valid KNX group address (observe address range). By default, an "On" is sent to group address 31/7/255.
After the set time in seconds for "Switch to replacement after:", the system switches to the replacement configuration. The system does not automatically switch back to the main connection. Switching is deactivated with "0".
A second KNX interface can be created in the "Substitute configuration" tab. The data point in the "Configuration" folder can be used to switch between the standard and replacement configuration via an On signal.
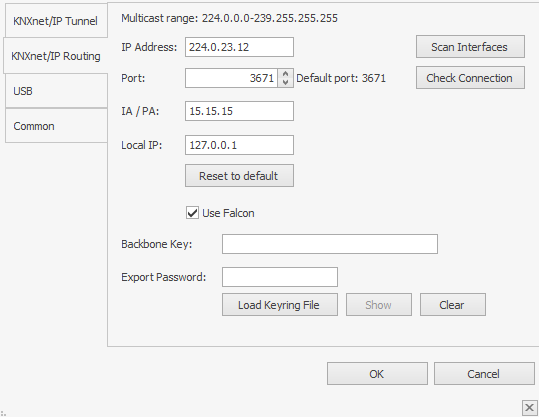
KNXnet/IP routing (with and without Falcon):
The multicast/routing connection is the fastest connection. This is preset and requires the least configuration effort. The standard routing address 224.0.23.12 is preset in all KNXnet/IP routers and in the EisBaer. The IP address must be entered without a leading "0". However, multicast is blocked in most managed networks and cannot be used.
A functioning network topology or at least a network crossover cable (fixed IP addresses set) is required to connect the EisBaer server PC to the KNX system. A KNXnet/IP router is required as the remote station. The local, fixed IP address must then also be entered in the driver. With the "Scan interface" button, all available KNX routers are listed with the corresponding IP. When the desired interface is selected, all the necessary addresses are entered automatically and can therefore be adopted directly.
The sender address that is entered in the KNX telegrams is entered under "KNX address". This address has no functional effect (e.g. for the filter table check). The addresses correspond to the physical address of a KNX device. By default, the address 15.15.15 is entered here. This makes it easy to recognise which telegram comes from the EisBaer during a recording. For secure systems, the correct KNX address and keys must be set, see chapter IP Secure and Data-Secure.
The Falcon driver layer, "Scan interface" and Secure are deactivated by unchecking the "Falcon" box.
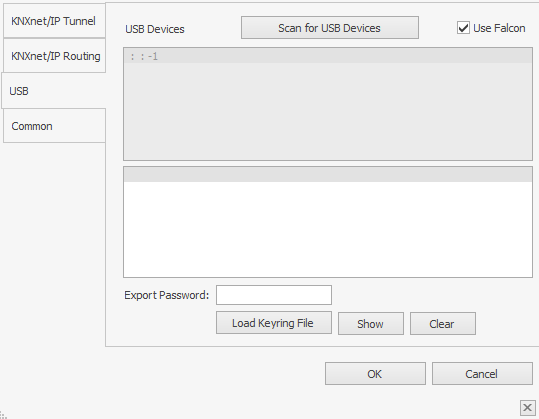
USB (with and without Falcon):
This driver setting is used to connect KNX USB interfaces. The KNX Windows USB energy-saving fix must be executed before use. The USB interface must be connected for this. Otherwise, the USB connection will be switched off by the Windows energy-saving function.
The Falcon driver is activated by default. This recognises old and new interfaces.
The interface is searched for via "Scan for USB devices". During the search, "Please wait" is displayed. The search is only completed when this display disappears. After a successful search, the corresponding interface appears in the list and must be selected and accepted with "OK".
If the Falcon driver is deactivated, the system switches to our USB driver. With this, the names of the manufacturers are given. This makes it possible to operate several KNX connections with different USB interfaces within an EisBaer project.
If the driver detects an interruption in the USB connection or the KNX wiring, the driver goes offline and attempts to re-establish the connection. At the same time, this is signalled via the "Driver status" data point. When the connection is re-established, the driver automatically goes online and queries the statuses if necessary (if "Read values from KNX" is activated).
The KNX connection provides data points for extensive display and diagnostic functions.
Tip: After connecting the "Driver status" data point with the status input of a button or a "Value-dependent text" as a display element, the status of the driver can be displayed. The status is displayed as undefined if the driver is switched off. The on state means that the connection is activated and working.
When using a USB interface or KNXnet/IP interface, the Off state means that the USB cable or network cable is interrupted or the interface has no bus voltage.
Data points of the component
Component name |
Type |
Function |
|---|---|---|
Initialise data points (used) |
Bidirectional |
On if the values of the group addresses are read at driver start. |
Initialise data points is active |
Output |
On while group addresses are being initialised on the KNX. The output is set to Off once the read operations have been completed. |
Initialise data points now start/stop |
Input |
If an On signal is applied to this input, all group addresses with the Read flag are read from the KNX. This process is stopped when an Off signal is applied. |
Debug |
Output |
Error texts are output here. These can be displayed using the"Log window" component, for example. The diagnostic information is displayed there, linked to the [Signal] input of the log window. If several drivers are available, the displays can be switched via the debugger. |
Dynamic |
folder |
The data points (communication objects) for the available KNX devices are made available in the Dynamic folder. They are displayed according to the topology of the system. |
ETS Logging (On/Off) |
Input |
If the box is ticked, all telegrams from the group addresses in the data point list are written to ETS Monitor readable log files. The files are located in the project directory in the "EtsLogging" folder. |
KNX telegrams per second |
Output |
Output of the number of all telegrams per second. |
Configuration |
Folder |
The settings of the KNX connection can be set and/or called up via the data points contained here (see below). |
Monitor |
Output |
In conjunction with the protocol window, all bus telegrams are output here. Attention: The corresponding output is only intended for use in the event of an error. If used, it could significantly impair the performance of the service. |
Send active |
Bidirectional |
Sending to the KNX can be deactivated with an Off signal. |
Driver On/Off |
Bidirectional |
This is used to activate or deactivate the driver. It is output whether the driver is active. |
Gateway driver - BACnet server |
Bidirectional |
Bidirectional communication interface between KNX and BACnet server.See Gateway driver. |
Gateway driver - MQTT client |
Bidirectional |
Bidirectional communication interface between KNX and MQTT Client.See Gateway driver. |
Driver status |
Output |
Displays the status of the driver. On= Connection OK, Off=Connection faulty, Undefined=Driver off |
Unknown group address |
Output |
If a group address is received from the KNX bus which is not in the data point list of the KNX driver, an ON signal is output. |
Unknown group address telegram |
Output |
If an unknown group address is recognised, it is output as text. |
Connection settings |
Output |
Outputs the current settings of the driver as text. The output includes: Name;Connection type;Secure;IP;Port;KNX address;NAT |
Status table |
Input |
Data connection for the KNX Telegram Player component. |
Configuration folder :
Settings can be changed at runtime. However, this does not replace the settings in the KNX driver settings.
IGS settings are not supported.
Name: Name |
Type |
Type Function |
|---|---|---|
Change generic configuration |
Bidirectional |
The configuration for the driver can be changed/set via a text. For USB, for example, the text looks like this: |
Activate routing configuration |
Bidirectional |
This communication type is used with an ON signal. The connection settings are taken from the "KNXnet/IP Routing" driver settings. If the configuration was changed at runtime, this is used. |
Change routing configuration |
Bidirectional |
Structure of the configuration: |
Enable tunnelling replacement configuration |
Bidirectional |
This communication type is used with an ON signal. The connection settings are taken from the driver settings "KNXnet/IP Tunnel - Substitute configuration". If the configuration was changed at runtime, this is used. |
Change tunnelling replacement configuration |
Bidirectional |
Structure of the configuration: |
Activate tunnelling standard configuration |
Bidirectional |
This communication type is used with an ON signal. The connection settings are adopted from the "KNXnet/IP Tunnel - Standard configuration" driver settings. If the configuration was changed at runtime, this is used. |
Change tunnelling standard configuration |
Bidirectional |
Structure of the configuration: |
Activate USB configuration |
Bidirectional |
This communication type is used with an ON signal. The connection settings are taken from the driver settings. If the configuration was changed at runtime, this is used. |
Properties of the component
Component name |
Standard |
Function |
|---|---|---|
Data points from ETS |
(0 data points) |
Displays the currently available data points (communication objects) in the driver. |
Initialise data points (used) |
|
Specifies whether group addresses are read from the KNX when the driver is started. The following conditions must be met: - the data point must be linked in the polar bear project. - the read flag must be set in the KNX device object. - the read priority must not be None. |
Send active |
X |
If the check mark is set, telegrams are sent to the KNX. If the check mark is not set, telegrams are received but not sent. |
Telegram delay [ms] |
50 |
Send delay between two telegrams in ms. This delay also applies to "Read values from KNX" |
Driver setting |
EisBaer;KNXnet/IP routing |
Specifies which KNX driver is to be used (KNXnet/IP, USB or IGS). |
ETS monitor logging |
|
If the box is ticked, all telegrams from the group addresses in the data point list are written to ETS Monitor readable log files. The file is located in the project directory in the "EtsLogging" folder. |
Logging storage interval [min] |
5 |
The telegram log files are written to the data carrier at this interval of 5-10 minutes. In between, the data is only collected in the working memory. |
Set components to "Undefined" in case of bus interruption |
|
If the bus connection is interrupted, all components connected to the driver are set to undefined. |
Driver on/off |
X |
Switch driver on or off. |
Sample templates:
Download link: KNX-Driver-Panel
General information about sample templates (SCADAComp):
Download the desired SCADAComp file and unzip the ZIP file into an empty folder. In the EisBär editor ribbon, select the "Import components" option under "Project" and load the template. If a conversion is necessary because the EisBär version is newer, confirm the process with YES. To retain functionality, select the "Create new networks" option as the copy rule when pasting.